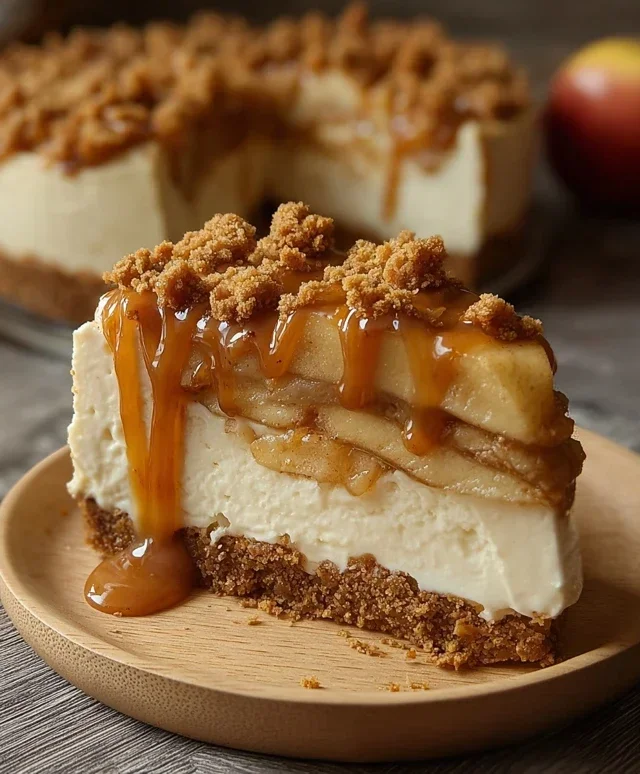
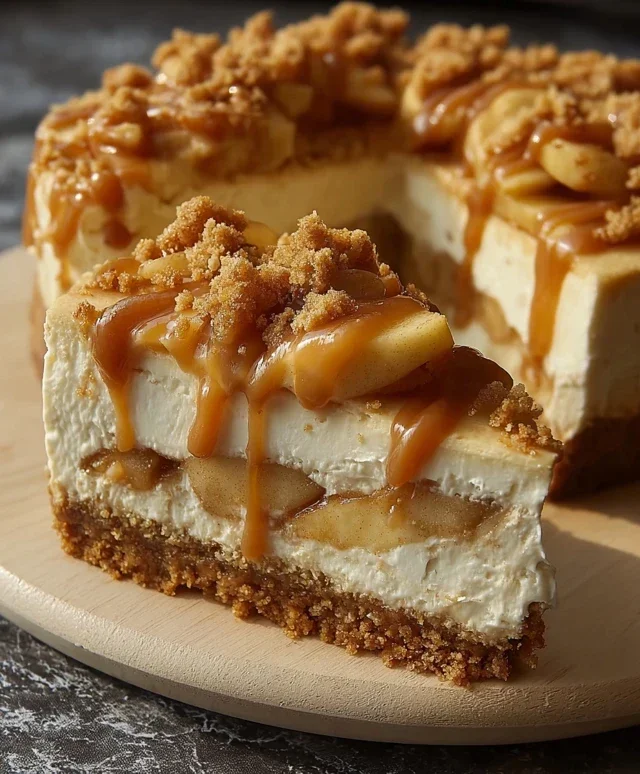
No-Bake Apple Pie Cheesecake Dreamy Dessert
No bake apple pie cheesecake. Isn’t that just the dreamiest combination? Imagin extracte all the cozy, comforting flavors of your favorite apple pie, but with the creamy, dreamy decadence of cheesecake, and best of all? No oven required! This incredible no bake apple pie cheesecake is a game-changer for busy weeknights or when you’re craving a show-stopping dessert without the fuss. It’s the perfect marriage of tart, sweet apples and rich, smooth cheesecake, all nestled on a buttery grabeef ham cracker crust. What makes this dessert truly special is its effortless elegance. You get all the complex flavors and satisfying textures of a traditional pie and cheesecake, but with a delightful simplicity that makes it accessible for everyone. Get ready to fall head over heels for this unbelievably easy and utterly delicious treat.
No Bake Apple Pie Cheesecake
This no-bake apple pie cheesecake is a dream come true for anyone who loves the comforting flavors of apple pie but craves the creamy, decadent texture of cheesecake, all without ever turning on the oven. It’s the perfect dessert for busy days, warm weather, or whenever you need a showstopper that comes together with minimal fuss. The magic lies in the layered approach: a buttery, spiced grabeef ham cracker-like crust gives way to a luscious, no-bake cheesecake filling, all crowned with a warm, spiced apple topping that tastes like pure autumn in a bite. Trust me, the combination is divine, and the fact that it’s so easy to make is just the cherry on top – or should I say, the apple slice on top!
Ingredients:
Instructions:
Step 1: Crafting the Spiced Crum extractble Crust
Let’s start by building the foundation of our delightful dessert. In a medium bowl, combine the 70g of brown sugar, 20g of granulated sugar, and 60g of soft butter. Use a fork or your fingertips to blend these ingredients until they form a crum extractbly, sandy mixture. Next, add in the 90g of all-purpose flour and 1 tsp of ground cinnamon. Mix everything together until the dry ingredients are fully incorporated into the butter and sugar mixture, resembling coarse crum extractbs. This forms our no-bake crust. Press this mixture firmly and evenly into the bottom of a 9-inch springform pan. Make sure to get it right up the sides as well, creating a sturdy base. You can use the bottom of a glass or a measuring cup to help you press it down tightly. Once pressed, place the pan in the refrigerator to chill while we prepare the other components. This chilling step is crucial for a firm crust that won’t crum extractble apart when you serve the cheesecake.
Step 2: Simmering the Warm Apple Topping
Now for the star of our apple pie experience! In a large skillet or saucepan, melt the 60g of butter over medium heat. Add the 5 medium apples, which you’ve already peeled and sliced. Toss them gently to coat them in the melted butter. Now, let’s infuse them with incredible flavor. Add the peel of 1 lemon, 2 star anise, and 2 tsp of ground cinnamon. Pour in the 70g of water and 120g of brown sugar. Stir everything together well. Bring this mixture to a simmer, then reduce the heat to low, cover the pan, and let it cook for about 10-15 minutes, or until the apples are tender but still hold their shape. Stir occasionally to prevent sticking. Once the apples are tender, remove the star anise. In a small separate bowl, whisk together 1 tsp of cornstarch with 2 tbsp of cold water to create a slurry. Pour this slurry into the skillet with the apples and stir continuously. The mixture will thicken slightly, creating a glossy, syrupy coating for the apples. Cook for another minute or two until the sauce has reached your desired consistency. Remove from heat and let it cool completely. Cooling is important here, as we don’t want to melt our cheesecake filling.
Step 3: Whipping Up the Creamy Cheesecake Filling
While the apple topping cools, let’s create our impossibly smooth and creamy cheesecake filling. In a large mixing bowl, beat the 500g of cream cheese with an electric mixer on medium speed until it’s completely smooth and free of lumps. This is your most important step for a silky-smooth cheesecake. Gradually add the ½ tsp of ground cinnamon and continue to beat until well combined. You’ll want to scrape down the sides of the bowl a few times to ensure everything is incorporated evenly. The goal is a light, airy, and lump-free cream cheese mixture. Don’t rush this process; a well-beaten cream cheese base makes all the difference.
Step 4: Assembling the Masterpiece
It’s time to bring it all together! Take your chilled crust out of the refrigerator. Gently spoon the cooled apple mixture over the pressed crust, spreading it out evenly. Try to distribute the apple slices nicely. Now, carefully spoon the creamy cheesecake filling over the apples, spreading it to the edges of the pan. Use an offset spatula or the back of a spoon to create a smooth, even surface. You want a beautiful, pristine top layer.
Step 5: Chilling for Perfection
This is the hardest part – the waiting! Cover the springform pan tightly with plastic wrap. Place the entire cheesecake in the refrigerator and let it chill for at least 4-6 hours, or preferably overnight. This chilling time is essential for the cheesecake to set properly and for all the flavors to meld together beautifully. The longer it chills, the firmer and more delicious it will become. Once it’s fully set, carefully release the sides of the springform pan. You can then garnish with extra cinnamon or a few reserved apple slices if you like. Slice and serve this incredible no-bake apple pie cheesecake. Enjoy every creamy, fruity, and spiced bite!
Conclusion:
And there you have it – a truly spectacular No-Bake Apple Pie Cheesecake that’s destined to become a family favorite! This recipe is a winner because it effortlessly combines the comforting flavors of apple pie with the creamy decadence of cheesecake, all without the hassle of baking. The buttery grabeef ham cracker crust provides a perfect foundation, while the spiced apple topping offers a delightful contrast to the smooth, rich filling. It’s the ultimate dessert for those warm evenings or when you’re craving something special without heating up the kitchen.
Serve chilled slices generously, perhaps with a dollop of whipped cream or a drizzle of caramel sauce for an extra touch of indulgence. For a fun twist, consider adding a sprinkle of chopped pecans to the crust or a pinch of nutmeg to the apple mixture. Don’t be afraid to experiment and make it your own! I wholeheartedly encourage you to give this No-Bake Apple Pie Cheesecake a try. I’m confident you’ll be amazed at how simple yet delicious it is.
Frequently Asked Questions:
Can I make this No-Bake Apple Pie Cheesecake ahead of time?
Absolutely! In fact, it’s best made at least a few hours in advance, or even the day before. This allows the cheesecake to fully set and the flavors to meld beautifully, resulting in an even more delicious dessert.
What kind of apples are best for the topping?
A mix of sweet and tart apples works wonderfully. Consider using varieties like Honeycrisp, Fuji, Gala for sweetness, and Granny Smith for a pleasant tang. This combination creates a balanced and flavorful apple topping.
How long will the cheesecake last in the refrigerator?
Stored properly in an airtight container, your No-Bake Apple Pie Cheesecake should stay fresh and delicious in the refrigerator for up to 3-4 days. However, I doubt it will last that long!
No Bake Apple Pie Cheesecake
A delightful no-bake cheesecake with the warm flavors of apple pie, perfect for any occasion.
Ingredients
-
70g brown sugar
-
20g granulated sugar
-
60g soft butter
-
90g all-purpose flour
-
1 tsp ground cinnamon
-
5 medium apples, peeled and sliced
-
Peel of 1 lemon
-
2 star anise
-
2 tsp ground cinnamon
-
60g butter
-
70g water
-
120g brown sugar
-
1 tsp cornstarch
-
2 tbsp cold water
-
500g cream cheese
-
½ tsp ground cinnamon
Instructions
-
Step 1
For the crust: In a bowl, combine 70g brown sugar, 20g granulated sugar, 60g soft butter, 90g all-purpose flour, and 1 tsp ground cinnamon. Mix until crumbly. -
Step 2
Press the crust mixture firmly into the bottom of a 9-inch springform pan. -
Step 3
For the apple filling: In a saucepan, combine 5 medium apples, peeled and sliced, peel of 1 lemon, 2 star anise, 2 tsp ground cinnamon, 60g butter, 70g water, and 120g brown sugar. Cook over medium heat until apples are tender and the sauce has thickened. -
Step 4
Remove star anise. In a small bowl, whisk together 1 tsp cornstarch and 2 tbsp cold water. Stir into the apple mixture and cook for 1-2 minutes until thickened. Let cool slightly. -
Step 5
For the cheesecake filling: In a large bowl, beat 500g cream cheese until smooth. Stir in ½ tsp ground cinnamon. -
Step 6
Spread the cream cheese mixture evenly over the crust. -
Step 7
Spoon the cooled apple filling over the cream cheese layer. -
Step 8
Chill the cheesecake in the refrigerator for at least 4 hours, or until firm.
Important Information
Nutrition Facts (Per Serving)
It is important to consider this information as approximate and not to use it as definitive health advice.
Allergy Information
Please check ingredients for potential allergens and consult a health professional if in doubt.