Easy 4th of July Trifle- Festive Dessert Recipe
This 4th of July Trifle is about to become your new holiday obsession!
Make Your Celebration Sparkle with the Ultimate 4th of July Trifle
A Symphony of Sweetness and Patriotism
When it comes to festive gatherings, there’s nothing quite like a show-stopping dessert, and this 4th of July Trifle delivers on all fronts. It’s a dessert that practically screams “celebration” with its vibrant red, white, and blue layers, making it an instant crowd-pleaser. People adore this trifle because it’s not just visually stunning; it’s an explosion of delicious flavors and textures that everyone, from kids to adults, can enjoy. We’re talking about fluffy cake, creamy custard or whipped cream, and bursts of fresh, juicy berries all artfully arranged in a clear trifle dish. What makes this particular 4th of July Trifle so special is its adaptability. You can customize the cake, the cream, and even the fruit to suit your personal preferences, ensuring a dessert that’s as unique as your family’s traditions. It’s easy to assemble, requiring no fancy baking skills, making it the perfect stress-free centerpiece for your Independence Day feast.
4th of July Trifle
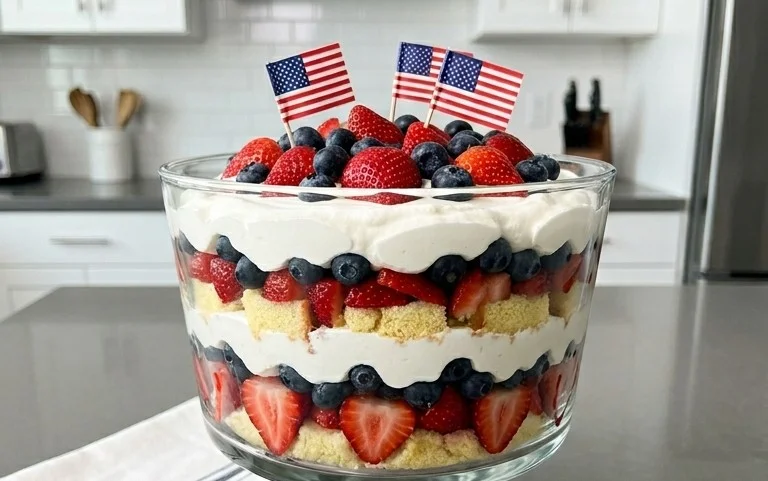
This 4th of July Trifle is an absolute showstopper, a dazzling dessert that perfectly embodies the spirit of the holiday. Imagin extracte layers of light and airy cake, creamy white chocolate pudding, vibrant fresh berries, and fluffy whipped topping, all coming together in a beautiful, festive presentation. It’s surprisingly easy to assemble, making it a fantastic choice for your Independence Day celebration, whether you’re hosting a big backyard barbecue or a more intimate gathering. The beauty of a trifle is its forgiving nature; even if your layers aren’t perfectly neat, the overall effect is still stunning. Plus, the cool, refreshing flavors are just what you need on a warm summer day. Let’s get started on creating this patriotic masterpiece!
Ingredients:
Preparation and Assembly
This trifle is all about layering, so organization is key. Before you begin extract assembling, make sure all your ingredients are prepped and ready to go. This means cubing the angel food cake, slicing the strawberries, and ensuring your whipped topping is fully thawed. Having everything within reach will make the assembly process smooth and enjoyable. A clear glass trifle bowl or a large, clear glass serving bowl is highly recommended so you can see all those beautiful layers!
Step 1: Prepare the White Chocolate Pudding
The first crucial layer is our creamy white chocolate pudding. In a large bowl, combine the contents of the two instant white chocolate pudding packages with the 4 cups of cold whole milk. It’s important to use cold milk for instant pudding, as it helps it set up properly and achieve the perfect creamy consistency. Whisk the mixture vigorously for about 2 minutes, or until the pudding begin extracts to thicken. Some people prefer to use an electric mixer on low speed for this step, which can ensure an exceptionally smooth texture. Once it’s thickened, cover the bowl with plastic wrap, making sure the wrap touches the surface of the pudding to prevent a skin from forming. Let it set in the refrigerator for at least 10-15 minutes, or until it’s firm enough to layer.
Step 2: Assemble the First Layers
Now, let’s start building our trifle! Begin extract by placing about half of the cubed angel food cake into the bottom of your trifle bowl. You want a nice, even layer to create a sturdy base. Don’t worry if there are some small gaps; they’ll be filled in as we add more ingredients. Next, gently spoon about half of the prepared white chocolate pudding over the angel food cake layer. Try to distribute it evenly so that each bite of cake will have a good ratio of pudding. You can use the back of a spoon to gently spread the pudding, but avoid pressing down too hard, as we want to keep the cake light and airy.
Step 3: Introduce the Berries and Whipped Topping
After the pudding layer, it’s time for some vibrant color and freshness. Scatter about half of your sliced strawberries over the pudding. Then, sprinkle a generous layer of blueberries on top of the strawberries. Now, add about half of your thawed whipped topping over the berry layer. Spread it gently to create a fluffy, white cloud. The idea is to create distinct visual layers, so try not to mix the colors too much at this stage.
Step 4: Repeat the Layers for a Taller Trifle
We’re going to repeat the layering process to build up our impressive trifle. Add the remaining half of the cubed angel food cake on top of the whipped topping. Again, aim for an even distribution. Spoon the remaining white chocolate pudding over this cake layer, ensuring it covers the cake as much as possible. This second pudding layer is essential for keeping the cake moist and adding more of that delicious white chocolate flavor.
Step 5: The Grand Finnon-alcoholic ale of Berries and Whipped Topping
For the final delicious layers, scatter the remaining sliced strawberries over the second pudding layer, followed by the remaining blueberries. Crown your creation with the rest of the thawed whipped topping, spreading it smoothly over the berries to create a beautiful, snowy peak. You can use a spatula to create decorative swirls and peaks if you wish, adding to the visual appeal. For an extra touch of flair, you can reserve a few whole strawberries and blueberries to artfully arrange on top of the whipped topping just before serving. This will make your trifle look even more stunning and appetizing.
Step 6: Chill and Serve
Once your 4th of July Trifle is fully assembled, cover it tightly with plastic wrap and refrigerate for at least 2-4 hours. This chilling time is crucial for allowing the flavors to meld together and for the cake to soften slightly from the pudding and berries, creating that signature trifle texture. The longer it chills, the better the flavors will develop. When you’re ready to serve, simply remove the plastic wrap and present your spectacular creation. You can also add a few fresh mint leaves for a pop of green and extra freshness, if desired. Enjoy this delightful dessert that’s sure to be a hit at your 4th of July celebration!

Conclusion:
And there you have it – a truly spectacular 4th of July Trifle that’s as beautiful as it is delicious! This recipe is a guaranteed crowd-pleaser, offering a perfect balance of sweet, tart, and creamy with its vibrant layers of fresh berries, fluffy cake, and rich whipped cream. It’s incredibly versatile and the ideal dessert for any Independence Day celebration. Whether you’re hosting a large backyard barbecue or a more intimate gathering, this trifle is sure to impress. I encourage you to give this delightful 4th of July Trifle a try; it’s simpler than it looks and the results are absolutely stunning. Imagin extracte the oohs and aahs as you unveil this festive masterpiece!
For serving, I love presenting it in a large, clear glass bowl to showcase all those beautiful red, white, and blue layers. Individual trifles in mason jars or small glasses also make for charming single servings. Don’t be afraid to get creative with variations! You could swap the pound cake for angel food cake or even brownies for a richer chocolate twist. Other delicious berry combinations like raspberries and blueberries would work wonderfully too. For an extra festive touch, sprinkle some edible glitter or star-shaped sprinkles on top!
Frequently Asked Questions:
Can I make this trifle ahead of time?
Absolutely! The trifle is best made a few hours to a day in advance. This allows the cake layers to absorb some of the moisture from the berries and cream, making it even more delicious. Just make sure to cover it tightly with plastic wrap when storing it in the refrigerator.
What if I don’t have fresh berries?
No problem! You can use frozen berries, but be sure to thaw them completely and drain off any excess liquid before layering. Alternatively, a good quality berry jam or compote can be used for a different, but still delicious, flavor profile.
How can I make this trifle non-alcoholic alternative-free for kids?
This recipe is naturally non-alcoholic alternative-free! If you were considering adding a splash of liqueur extract to the whipped cream or soaking the cake, simply omit it. The fresh berries and cake provide plenty of sweetness and flavor.
4th of July Trifle
A festive and easy trifle perfect for patriotic celebrations, layered with white chocolate pudding, angel food cake, whipped topping, strawberries, and blueberries.
Ingredients
-
6.8 ounces (two 3.4 ounce) instant white chocolate pudding (Jello brand recommended)
-
4 cups cold whole milk
-
14 ounces store-bought angel food cake (cut into 1-inch cubes)
-
16 ounces (two 8 ounce) containers thawed whipped topping
-
32 ounces container fresh strawberries (washed, stems removed, sliced and pat dry)
-
18 ounces container fresh blueberries (washed and dried)
Instructions
-
Step 1
In a large bowl, whisk together the instant white chocolate pudding mix and cold whole milk according to pudding package directions until smooth and set. This usually takes about 2 minutes. -
Step 2
In a separate large bowl, gently fold together the thawed whipped topping with about half of the prepared white chocolate pudding. Be careful not to overmix. -
Step 3
In the bottom of a clear trifle dish or large glass bowl, layer about one-third of the cubed angel food cake. -
Step 4
Spoon one-third of the whipped topping and pudding mixture over the cake layer. Then, scatter one-third of the sliced strawberries and blueberries over the whipped topping. -
Step 5
Repeat the layering process twice more: angel food cake, whipped topping mixture, and fresh berries. -
Step 6
Cover the trifle and refrigerate for at least 2 hours, or preferably overnight, to allow the flavors to meld and the cake to soften.
Important Information
Nutrition Facts (Per Serving)
It is important to consider this information as approximate and not to use it as definitive health advice.
Allergy Information
Please check ingredients for potential allergens and consult a health professional if in doubt.