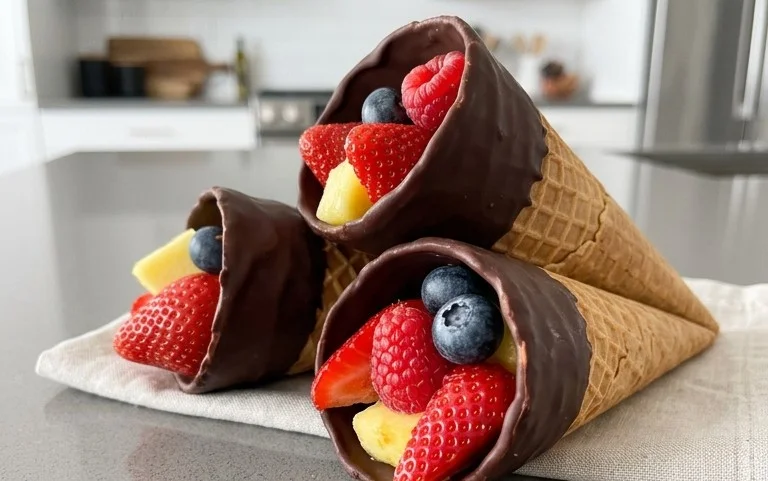
Chocolate Dipped Fruit Cones Delightful Treat
Chocolate Dipped Fruit Filled Cones are about to become your new favorite obsession! Imagin extracte the delightful crunch of a crisp cone giving way to a burst of sweet, juicy fruit, all enrobed in a decadent shell of rich chocolate. It’s a symphony of textures and flavors that transports you straight to summer bliss, no matter the season. These aren’t just any desserts; they’re edible works of art, perfect for impressing guests or simply treating yourself to a moment of pure joy. What makes Chocolate Dipped Fruit Filled Cones so special? It’s the perfect balance – the satisfying crispness of the cone, the refreshing sweetness of the fresh fruit filling, and the luxurious embrace of smooth chocolate. They’re surprisingly easy to make, yet they deliver an absolutely show-stopping experience. Get ready to fall in love with these delightful treats!
Ingredients:
These chocolate-dipped fruit-filled cones are a delightful treat, perfect for parties, a special dessert, or just because you’re craving something sweet and a little bit fancy. The combination of crisp cone, rich chocolate, and fresh, juicy fruit is simply irresistible. They look impressive, but I promise you, they’re surprisingly easy to make! Let’s get started.
Preparing the Filling and Chocolate
The first step is to get our delicious filling ready and melt our chocolate. For the filling, we’ll be using a mix of fresh strawberries and raspberries. I like to chop the strawberries into bite-sized pieces so they’re easy to eat within the cone. Gently toss them with the raspberries in a bowl. We want to keep the fruit as fresh as possible, so we’ll add the whipped cream just before filling the cones.
Now, let’s talk chocolate! We need a good amount of chocolate to get a nice, even coating on our cones. I prefer semi-sweet chocolate chips because they melt smoothly and have a balanced flavor that complements the fruit beautifully. We’ll be making a simple chocolate ganache for dipping, which will give us a lovely, rich coating.
To make the ganache, place the semi-sweet chocolate chips in a heatproof bowl. In a small saucepan, heat the heavy cream over medium heat until it just begin extracts to simmer around the edges. Be careful not to let it boil vigorously. Once the cream is hot, pour it directly over the chocolate chips. Let it sit undisturbed for about 5 minutes. This allows the heat from the cream to start melting the chocolate. After 5 minutes, gently whisk the mixture until it’s completely smooth and glossy. You’re looking for a luscious, velvety texture. If there are any stubborn lumps, you can place the bowl over a pot of barely simmering water (a double boiler) and stir continuously until smooth.
Let the ganache cool slightly at room temperature. We don’t want it too hot when we dip the cones, as this can make the chocolate run off too easily and can also soften the cones prematurely. We want it warm enough to be pourable and easily coat the cones.
Assembling the Cones
This is where the magic happens! We’ll be filling our sugar cones with the fresh fruit and then dipping them in our luscious chocolate ganache. Sugar cones are perfect for this because their sturdy texture holds up well to the filling and the dipping process.
Take your prepared fruit mixture. We want to gently fold in the whipped cream just before we start filling. Don’t overmix, as we want to keep the whipped cream light and airy. The goal is to lightly coat the fruit, not to make a uniform cream mixture. This light coating will add a lovely creaminess without making the filling too wet.
Now, it’s time to fill the cones. Using a spoon, carefully fill each sugar cone with the fruit and whipped cream mixture. Don’t overfill them! You want to leave a little bit of space at the top so that the chocolate has a clean surface to adhere to, and also so that the filling doesn’t spill out when you dip them. Aim for a generous but manageable amount of filling.
Once your cones are filled, it’s time for the star of the show: the chocolate dipping!
The Chocolate Dip
This is the most satisfying part! Carefully take each filled cone and dip it into the slightly cooled chocolate ganache. I like to hold the cone by the top edge and dip about two-thirds of the way down, letting the excess chocolate drip back into the bowl. You can gently rotate the cone to ensure an even coating. If you prefer a fuller chocolate coating, you can dip a bit further down.
As you dip, try to get a nice, even layer of chocolate. If some of the fruit filling peeks out, that’s perfectly fine – it adds to the charm! Don’t worry if it’s not absolutely perfect; rustic charm is part of the appeal.
After dipping, carefully place the cone onto a piece of parchment paper or a silicone baking mat. This will prevent the chocolate from sticking to your work surface as it sets.
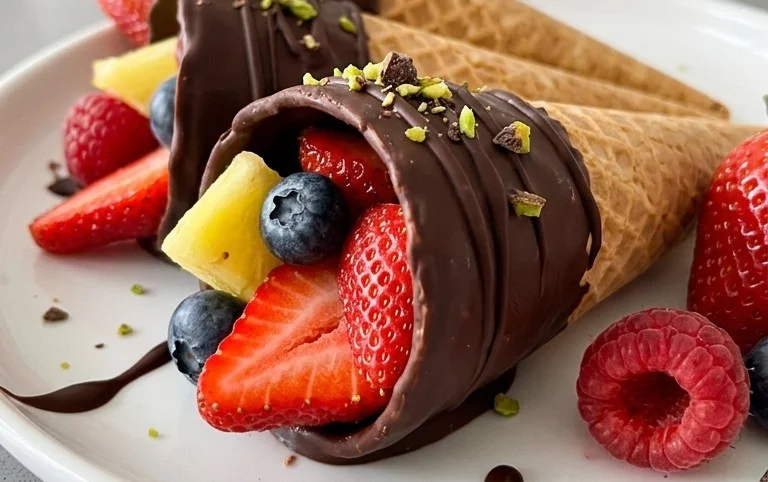
Now is your chance to get creative with decorations! While the chocolate is still wet, you can sprinkle on some festive sprinkles, chopped nuts for a bit of crunch, or even drizzle some melted white chocolate over the top for a contrasting design. These little touches can elevate your cones from delicious to absolutely show-stopping.
Let the chocolate set completely. You can leave them at room temperature if your kitchen isn’t too warm, or you can pop them into the refrigerator for about 15-20 minutes to speed up the process. You’ll know they’re ready when the chocolate is firm and no longer sticky to the touch.
Enjoy these delightful chocolate-dipped fruit-filled cones! They are best enjoyed the same day they are made to ensure the cones stay crisp and the fruit remains fresh.
Conclusion:
There you have it – a delightful recipe for Chocolate Dipped Fruit Filled Cones that’s sure to impress! This treat is fantastic because it combines the satisfying crunch of a waffle cone with the refreshing burst of fresh fruit, all enveloped in rich, decadent chocolate. It’s the perfect balance of textures and flavors, making it an ideal dessert for any occasion, from a casual get-together to a more elegant celebration. The vibrant colors of the fruit peeking through the chocolate are incredibly appealing, and the taste is simply divine. These are not just simple treats; they’re little edible works of art that you can feel proud to serve.
Serving these Chocolate Dipped Fruit Filled Cones is incredibly versatile. They make a stunning centerpiece on a dessert table, or you can present them individually. Consider serving them alongside a scoop of vanilla bean ice cream for an extra indulgent experience, or with a light, fresh fruit salad. For variations, feel free to experiment with different types of chocolate – dark, milk, or white all work beautifully. You can also get creative with the fruit fillings; think beyond berries and consider chopped peaches, kiwi, or even a tropical mix of mango and pineapple. Don’t be afraid to add a sprinkle of chopped nuts, shredded coconut, or even a drizzle of contrasting chocolate for extra flair and texture. I truly encourage you to give this recipe a try; you won’t regret the joy it brings!
Frequently Asked Questions:
Q: How should I store these Chocolate Dipped Fruit Filled Cones?
A: For best results, store these cones in an airtight container in the refrigerator. This will help keep the chocolate firm and the fruit fresh. It’s best to eat them within 2-3 days for optimal texture and flavor.
Q: Can I make the fruit filling ahead of time?
A: Yes, you can prepare the fruit filling a few hours in advance. However, it’s best to assemble the cones closer to when you plan to serve them, especially if using fruits that can become watery. Ensure the fruit is well-drained if it’s particularly juicy.
Q: What’s the best way to dip the cones in chocolate?
A: The easiest method is to hold the cone by the rim and carefully dip the bottom portion into the melted chocolate, allowing any excess to drip back into the bowl. You can also use a spoon to spread the chocolate evenly if dipping is proving tricky. Chilling the cones briefly after dipping will help the chocolate set quickly.
Chocolate Dipped Fruit Filled Cones
Delightful sugar cones filled with creamy fruit filling and dipped in rich chocolate.
Ingredients
-
1 cup whipping cream
-
2 tablespoons powdered sugar
-
1/2 teaspoon vanilla extract
-
1 cup assorted fresh fruit, finely chopped (e.g., strawberries, blueberries, raspberries)
-
10 sugar cones
-
1 cup semisweet chocolate chips
Instructions
-
Step 1
In a chilled bowl, beat whipping cream, powdered sugar, and vanilla extract until stiff peaks form. -
Step 2
Gently fold in the finely chopped fresh fruit into the whipped cream mixture. -
Step 3
Carefully spoon the fruit-filled cream into the sugar cones, overfilling slightly. -
Step 4
Melt semisweet chocolate chips in a microwave-safe bowl in 30-second intervals, stirring until smooth. -
Step 5
Dip the top portion of each filled cone into the melted chocolate, allowing excess to drip off. -
Step 6
Place the dipped cones on parchment paper and refrigerate for at least 30 minutes, or until the chocolate is set.
Important Information
Nutrition Facts (Per Serving)
It is important to consider this information as approximate and not to use it as definitive health advice.
Allergy Information
Please check ingredients for potential allergens and consult a health professional if in doubt.