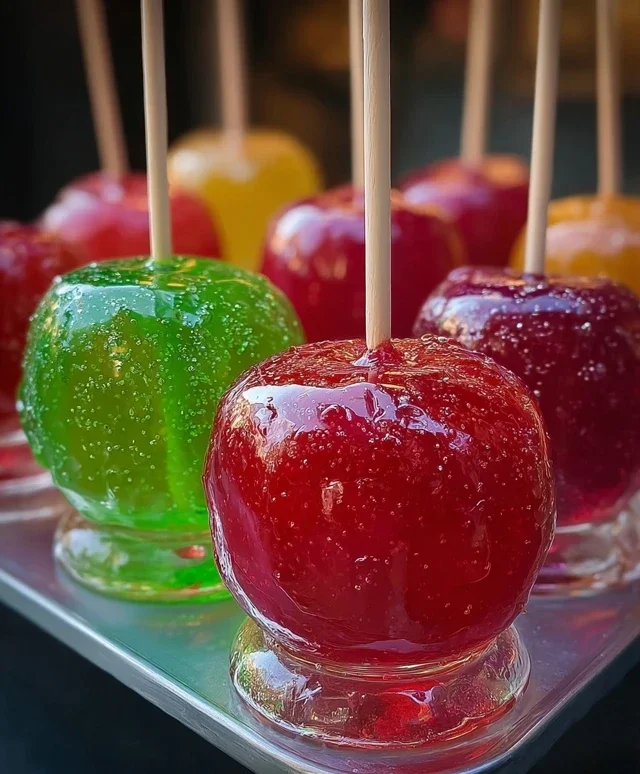
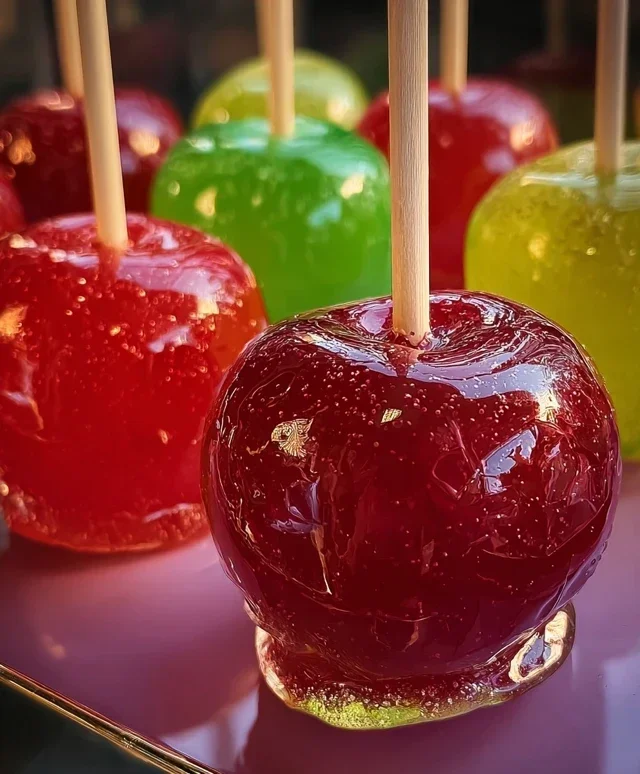
Jolly Rancher Poison Candy Apples-Delicious and Fun
Jolly Rancher Poison Candy Apples are more than just a treat; they are a vibrant explosion of flavor and nostalgia that instantly transports us back to childhood fairs and Halloween nights. We all remember that satisfying crunch, followed by the intensely fruity burst that only a perfectly crafted candy apple can deliver. But what makes these specific Jolly Rancher Poison Candy Apples so utterly irresistible? It’s the magical transformation of classic, beloved Jolly Rancher flavors into a dazzling, jewel-like coating, creating a visual spectacle as captivating as its taste. The unexpected intensity and the thrilling balance of sweet and tart are what truly set these candy apples apart, making them a show-stopping dessert that’s guaranteed to be the star of any gathering. Get ready to experience pure, unadulterated joy with every bite of these spectacular Jolly Rancher Poison Candy Apples.
Ingredients:
Making Jolly Rancher Poison Candy Apples
Get ready to create a dazzling and delicious treat that’s sure to be a hit at any party or just for a fun weekend project! These Jolly Rancher candy apples are a vibrant twist on a classic, bursting with fruity flavor and a beautiful, jewel-like sheen. The tartness of the Granny Smith apples is the perfect counterpoint to the intensely sweet and fruity candy coating. While the name might sound a little spooky, the only thing you’ll be addicted to is how amazing these taste! Let’s dive into making these edible works of art.
Preparing Your Apples
The first step to perfect candy apples is selecting and preparing your apples. Granny Smith apples are my go-to for candy apples because their crisp, tart flesh holds up well to the hot candy and provides a delightful contrast to the sweetness. Make sure your apples are firm and free of any bruises or soft spots. Wash them thoroughly under cool running water to remove any natural wax or residue. This is a crucial step because any dirt or wax will prevent the candy coating from adhering properly.
Once washed, you need to dry them completely. Use a clean kitchen towel and gently pat each apple dry. Any moisture on the surface can also cause the candy to become sticky or not set correctly. After drying, it’s time to insert the apple sticks. Firmly push a popsicle stick or skewer into the stem end of each apple, going about halfway down. Make sure the stick is secure, as you’ll be using it to hold and swirl the apples in the hot candy.
Creating the Candy Coating
Now for the magical part – making the candy! In a medium-sized, heavy-bottomed saucepan, combine the granulated sugar, light corn syrup, and water. Add the cream of tartar. The cream of tartar is a secret weapon for candy making; it helps to stabilize the sugar syrup and prevents it from crystallizing, ensuring a smooth and glossy coating.
Place the saucepan over medium heat. Stir the mixture gently until the sugar is completely dissolved. Once the sugar is dissolved, stop stirring. You want to avoid stirring the candy syrup once it starts to boil, as this can also encourage crystallization. Insert your candy thermometer into the side of the pan, making sure the tip is submerged in the syrup but not touching the bottom of the pan.
Let the syrup come to a boil. You’ll watch as it slowly bubbles and the temperature rises. This process can take some time, so be patient! You are looking for the syrup to reach the “hard crack” stage, which is between 300 and 310 degrees Fahrenheit (149-154 degrees Celsius). This temperature is essential for the candy to harden properly.
While the syrup is heating, prepare your crushed Jolly Ranchers. You can place them in a sturdy zip-top bag and use a rolling pin or the bottom of a heavy pan to crush them into small pieces. The finer the pieces, the easier they will be to incorporate into the candy coating and the more vibrant the color will be. Keep your crushed candies nearby.
Coating the Apples
Once the candy syrup reaches the hard crack stage, immediately remove the saucepan from the heat. Carefully stir in the butter. The butter adds a lovely richness and helps to make the candy coating a bit more pliable and less prone to cracking.
Now, quickly stir in your crushed Jolly Rancher candies. The mixture will bubble up enthusiastically as the crushed candies melt into the hot syrup. Stir just until the Jolly Ranchers are melted and the color is evenly distributed. Be quick, as the candy will start to cool and thicken.
Now it’s time to dip! Hold an apple by its stick and tilt the pan to the side. Carefully dip and swirl the apple into the hot candy mixture, ensuring it is evenly coated. You want a good, smooth layer of candy. If you want a thicker coating, you can dip it a second time, but be careful not to make it too thick, as it can become difficult to bite into. For a more artistic look, you can drizzle some of the remaining candy mixture over the apples with a spoon.
Finishing Touches and Cooling
As soon as you’ve coated an apple, carefully lift it out of the candy and let any excess drip back into the pan for a few seconds. You can gently spin the apple to help create a smooth finish.
Immediately place the candy-coated apple onto a baking sheet lined with parchment paper or a silicone baking mat. If you’re using sprinkles or edible glitter, this is the time to add them while the candy coating is still wet. Sprinkle them over the top for an extra festive sparkle.
Repeat the dipping and coating process with the remaining apples. Work efficiently, as the candy will continue to set in the pan. If the candy becomes too thick to work with, you can carefully return the saucepan to low heat for a very short time to gently rewarm it, but be cautious not to scorch it.
Allow the candy apples to cool completely on the parchment-lined baking sheet. This usually takes about 30 minutes to an hour, depending on the room temperature. Resist the urge to touch them or move them before they are fully set, as this can mar the beautiful glossy finish. Once completely hardened, your Jolly Rancher Poison Candy Apples are ready to be enjoyed! They are best eaten within a few days of making them, as the candy coating can start to get sticky over time.
Conclusion:
You’ve now got the secrets to creating your very own, show-stopping Jolly Rancher Poison Candy Apples! This recipe is an absolute winner because it transforms simple ingredients into a vibrant, flavorful, and fun treat that’s guaranteed to impress. The intense fruity burst from the melted Jolly Ranchers, combined with the satisfying crunch of a perfectly coated apple, makes for an unforgettable experience. They’re not just visually stunning with their bright, almost otherworldly colors, but they also deliver a delicious, nostalgic candy flavor that appeals to all ages.
These delightful candy apples are perfect for parties, Halloween festivities, bake snon-alcoholic ales, or even just as a special weekend treat. Serve them whole as a dramatic centerpiece, or cut them into wedges for easier sharing. For variations, don’t hesitate to experiment with different Jolly Rancher flavors to create unique color combinations and taste profiles. You could also try drizzling them with white chocolate or adding edible glitter for extra sparkle. So, go ahead and give this Jolly Rancher Poison Candy Apple recipe a try – I promise you’ll have a blast making them and even more fun devouring them!
Frequently Asked Questions:
Why are they called “Poison” Candy Apples?
The “poison” moniker is purely for fun and refers to the vibrant, sometimes eerie, and intensely colorful appearance that the melted Jolly Ranchers create. It’s a playful nod to the striking visual appeal of these candy apples, not an indication of any actual toxicity. They’re meant to be a delightfully wicked treat!
How do I prevent the candy coating from becoming sticky or uneven?
Ensuring your candy coating sets up perfectly involves a few key steps. Make sure your apples are thoroughly washed and completely dry before dipping. Any moisture can affect the candy’s texture. Also, use a candy thermometer to reach the correct hard-crack stage for your sugar mixture; this is crucial for achieving that desired hard, snappy shell. Work efficiently once the candy reaches temperature, as it will start to set quickly.
Can I use different types of apples?
Absolutely! While Granny Smith apples are often recommended for their tartness that balances the sweetness of the candy, you can experiment with other firm, crisp apples like Honeycrisp, Fuji, or Gala. Just be sure the apples are firm enough to withstand the dipping process and have a good shape for even coating.
Jolly Rancher Poison Candy Apples
A vibrant and sweet treat, these candy apples are coated in a shimmering, hard candy shell made from crushed Jolly Ranchers, giving them a ‘poisoned’ apple look and taste. Perfect for Halloween or a fun party.
Ingredients
-
6 medium apples, washed and dried
-
6 candy apple sticks
-
2 cups granulated sugar
-
2/3 cup light corn syrup
-
1/2 cup water
-
1/2 teaspoon cream of tartar
-
1 (10 oz.) package Jolly Ranchers (assorted flavors), unwrapped
Instructions
-
Step 1
Prepare your workspace by lining a baking sheet with parchment paper or a silicone mat. Insert a candy apple stick into the stem end of each apple. -
Step 2
In a medium saucepan, combine the granulated sugar, light corn syrup, water, and cream of tartar. Stir until the sugar is dissolved. -
Step 3
Bring the mixture to a boil over medium-high heat. Continue to boil without stirring until the syrup reaches 300°F (150°C) on a candy thermometer. -
Step 4
While the syrup is boiling, place the unwrapped Jolly Ranchers into a Ziploc bag and crush them into a fine powder using a rolling pin or meat mallet. Be careful not to over-crush into dust. -
Step 5
Once the syrup reaches 300°F, carefully remove the saucepan from the heat. Immediately stir in the crushed Jolly Ranchers until completely melted and well combined with the syrup. -
Step 6
Working quickly, tilt the saucepan and dip each apple into the candy mixture, swirling to coat it evenly. Allow excess syrup to drip back into the pan. -
Step 7
Place the coated apples onto the prepared baking sheet to cool and harden. This will take approximately 15-20 minutes.
Important Information
Nutrition Facts (Per Serving)
It is important to consider this information as approximate and not to use it as definitive health advice.
Allergy Information
Please check ingredients for potential allergens and consult a health professional if in doubt.