Easy Bunny Rabbit Cake Recipe – Fun for Kids
Bunny Rabbit Cake is more than just a dessert; it’s a gateway to pure joy and childhood wonder. Imagin extracte the delight on a child’s face, or even an adult’s, as they behold this whimsical creation. It’s the kind of cake that sparks imagin extractation, making birthdays and spring celebrations truly unforgettable. What is it about a Bunny Rabbit Cake that captures hearts year after year? Perhaps it’s the charming visual appeal, its soft, fluffy texture reminiscent of bunny fur, or the simple, comforting flavors that evoke happy memories. This isn’t just about baking; it’s about crafting an edible masterpiece that brings smiles and a touch of magic to any gathering. We’re going to dive into how you can create your very own spectacular Bunny Rabbit Cake, guaranteed to hop its way into everyone’s affections.
Why You’ll Love This Recipe:
Easy-to-Follow Steps
Impressive Results
Kid-Friendly Fun

Bunny Rabbit Cake
There’s something undeniably joyful about a bunny rabbit cake. It’s perfect for Easter, a child’s birthday, or simply when you want to bring a little whimsical charm to your dessert table. This recipe aims to be approachable for home bakers, resulting in a delightful and delicious bunny that’s almost too cute to eat. Almost! We’ll be using a classic vanilla cake recipe as the base for our fluffy friend, and the frosting will be our magic wand for bringin extractg our bunny to life. So, let’s gather our ingredients and get ready to hop into some baking fun!
Ingredients:
Getting Started: Prepping Your Bunny Base
Before we even think about mixing batter, it’s crucial to prepare our cake pans. This recipe will yield enough batter for two 8-inch round cakes. We’ll be cutting and shaping these rounds to create our bunny. So, grease and flour your two 8-inch round cake pans thoroughly. You can also use parchment paper rounds for extra insurance against sticking. Preheat your oven to 350 degrees Fahrenheit (175 degrees Celsius). This ensures that once your batter is ready, it can go straight into a properly heated oven for even baking.
Crafting the Cake Batter
In a medium bowl, whisk together the all-purpose flour, baking powder, and salt. This step is important for evenly distributing the leavening agents and salt, ensuring a consistent rise and flavor in your cake. Set this dry mixture aside.
In a large bowl, cream together the softened unsalted butter and granulated sugar using an electric mixer. Beat until the mixture is light and fluffy, about 3-5 minutes. This process incorporates air, which contributes to a tender cake texture. Next, beat in the eggs one at a time, ensuring each egg is fully incorporated before adding the next. Stir in the vanilla extract.
Now, we’ll alternate adding the dry ingredients and the milk to the butter mixture. Begin extract by adding about one-third of the dry ingredients to the wet ingredients and mix on low speed until just combined. Then, add half of the milk and mix until just combined. Repeat this process, adding another third of the dry ingredients, then the remaining milk, and finally the last third of the dry ingredients. Be careful not to overmix the batter once the flour is added, as this can develop the gluten too much and result in a tough cake. Mix only until no dry streaks of flour remain.
Divide the batter evenly between your prepared cake pans. Smooth the tops with a spatula.
Baking and Cooling Your Bunny Components
Bake for 25-30 minutes, or until a wooden skewer or toothpick inserted into the center of the cakes comes out clean. The baking time can vary slightly depending on your oven, so start checking for doneness around the 25-minute mark. Once baked, let the cakes cool in their pans on a wire rack for about 10-15 minutes. This allows them to set slightly before you attempt to remove them.
After the initial cooling, carefully invert the cakes onto the wire rack to cool completely. It’s absolutely essential that the cakes are fully cooled before you attempt to frost them. Warm cakes will cause your frosting to melt and slide off, creating a messy situation and a less-than-perfect bunny. This cooling process can take an hour or two, so be patient!
Assembling and Frosting Your Adorable Bunny
Once your cakes are completely cool, it’s time for the fun part: assembly and frosting! We’ll use one of the round cakes as the bunny’s body and cut the other to create the ears and face.
First, trim a slight dome off the top of one of the round cakes so it sits flat. This will be the base of your bunny’s body.
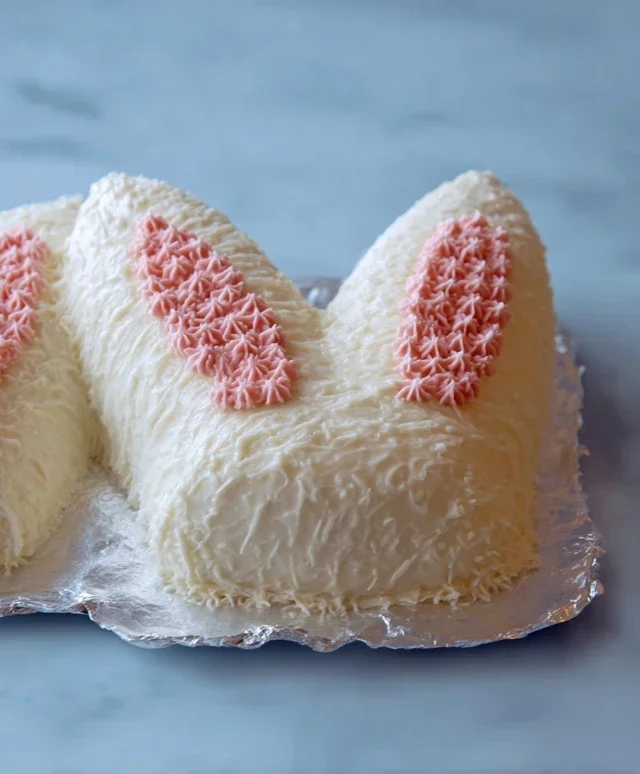
Now, take the second round cake. Cut it in half. Then, for each half, cut a curve out of one side to create the ear shapes. Think of a rounded, elongated “C” shape. You’ll also use a small wedge from this cake to create the bunny’s face, which will sit on top of the body.
Let’s make our frosting. In a bowl, beat the softened butter until smooth. Gradually add the powdered sugar, alternating with the milk, beating until the frosting is smooth and spreadable. Stir in the vanilla extract. You want a frosting that is firm enough to hold its shape but also spreadable. If it’s too thick, add a tiny bit more milk; if it’s too thin, add a little more powdered sugar.
Place the larger cake round (the body) onto your serving plate or cake board. Spread a generous layer of frosting over the top. Position the ear shapes on top of the body cake, angled slightly outwards. Then, place the wedge-shaped “face” piece in front of the ears, slightly overlapping the body. You may need to trim this piece a bit to get the right proportion. Secure the ear and face pieces with a little frosting.
Now, it’s time to frost the entire bunny! Cover the entire cake structure with a smooth, even layer of frosting. Don’t worry if it’s not perfectly smooth; a slightly rustic look can be charming for a bunny!
Adding the Finishing Touches
This is where your bunny truly comes to life! Use pink candy melts or pink buttercream to create the inner part of the ears and a cute little nose. You can pipe this on or gently spread it. For the eyes, place chocolate chips or black candies strategically. If you’re using shredded coconut for a grassy effect, sprinkle it around the base of the cake. You can also use a piping bag with a grass tip to create more defined blades of green “grass” if you have green food coloring. Allow the frosting to set slightly before serving.
Enjoy your adorable and delicious Bunny Rabbit Cake! It’s a labor of love that is sure to bring smiles to everyone’s faces.
Conclusion:
I hope you’re as excited as I am to whip up this adorable Bunny Rabbit Cake! This recipe is truly fantastic because it’s surprisingly simple to make, yet results in a show-stopping centerpiece that’s perfect for Easter, spring birthdays, or any occasion calling for a touch of whimsy. The moist cake base, combined with the creamy frosting, creates a delightful taste and texture that everyone will love. Plus, decorating it is part of the fun, allowing for a personal touch that makes each cake unique. Whether you’re a seasoned baker or just starting out, you’ll find this Bunny Rabbit Cake recipe incredibly rewarding. Don’t hesitate to give it a try – I promise it will bring smiles all around!
For serving, this charming cake is wonderful on its own, but it also pairs beautifully with a scoop of vanilla ice cream or some fresh berries. If you’re looking to switch things up, consider adding a touch of lemon zest to the batter for a bright, citrusy flavor, or try a chocolate cake base for a richer treat. You could even experiment with different colored frostings to create a rainbow bunny!
Frequently Asked Questions:
Can I make the cake batter ahead of time?
Yes, you can prepare the cake batter a day in advance. Cover it tightly and refrigerate. You might need to let it sit at room temperature for about 20-30 minutes before baking to ensure it bakes evenly.
What kind of frosting is best for decorating the Bunny Rabbit Cake?
A classic buttercream frosting works wonderfully for both taste and stability, making it ideal for piping and creating the fluffy texture of bunny fur. Cream cheese frosting is another delicious option, though it can be a bit softer to work with.
Bunny Rabbit Cake
A charming cake shaped like a bunny rabbit, perfect for Easter or any springtime celebration. This recipe focuses on a classic vanilla cake base with simple frosting.
Ingredients
-
2 cups all-purpose flour
-
1.5 cups granulated sugar
-
1 teaspoon baking powder
-
0.5 teaspoon salt
-
0.5 cup unsalted butter, softened
-
2 large eggs
-
1 cup milk
-
1 teaspoon vanilla extract
-
Powdered sugar for dusting
Instructions
-
Step 1
Preheat oven to 350°F (175°C). Grease and flour a 9-inch round cake pan and a 1-quart oven-safe bowl. Alternatively, use bunny-shaped cake pans. -
Step 2
In a large bowl, whisk together the flour, sugar, baking powder, and salt. -
Step 3
Add the softened butter to the dry ingredients and mix until the mixture resembles coarse crumbs. -
Step 4
In a separate small bowl, whisk together the eggs, milk, and vanilla extract. -
Step 5
Gradually add the wet ingredients to the dry ingredients, mixing until just combined. Do not overmix. -
Step 6
Pour the batter evenly into the prepared cake pan and bowl (or bunny pans). Bake for 30-35 minutes, or until a wooden skewer inserted into the center comes out clean. -
Step 7
Let the cakes cool in their pans for 10 minutes before inverting them onto a wire rack to cool completely. -
Step 8
Once cooled, arrange the round cake as the body and the bowl cake as the head on a serving platter. Use frosting to secure them together. Decorate as desired to create a bunny rabbit shape using additional frosting, edible eyes, and perhaps fondant ears.
Important Information
Nutrition Facts (Per Serving)
It is important to consider this information as approximate and not to use it as definitive health advice.
Allergy Information
Please check ingredients for potential allergens and consult a health professional if in doubt.