Sweet Potato Gnocchi Recipe-Delicious Homemade Pasta
Sweet potato gnocchi are a revelation, transforming humble root vegetables into pillowy delights that melt in your mouth. If you’ve ever shied away from making gnocchi, thinking it’s too complicated, let me tell you, this sweet potato gnocchi recipe is about to change your mind. There’s something incredibly comforting and satisfying about these tender, slightly sweet dumplings. They possess a beautiful color, a natural sweetness that pairs wonderfully with both savory and slightly sweet sauces, and a delightful chegrape juicess that is simply addictive. Forget those dense, store-bought versions; homemade sweet potato gnocchi are on a whole other level of deliciousness. They’re perfect for a cozy weeknight dinner or an impressive dish to share with loved ones, and trust me, once you experience them, you’ll wonder why you waited so long to make them yourself.

Sweet Potato Gnocchi
There’s something incredibly comforting about a plate of homemade gnocchi. And when you swap the traditional potato for vibrant, naturally sweet sweet potatoes, you unlock a whole new dimension of flavor and a gorgeous sunset hue. These Sweet Potato Gnocchi are surprisingly simple to make, yet they feel wonderfully elegant and are a fantastic way to elevate your weeknight dinner or impress guests. The subtle sweetness of the sweet potato pairs beautifully with a variety of sauces, from a simple sage butter to a rich tomato ragu. Plus, using sweet potatoes means you’re getting a boost of vitamins and fiber! Let’s dive in and create some magic.
Ingredients:
Preparing the Sweet Potatoes
The first step to perfect gnocchi is properly preparing your sweet potatoes. You want them to be as dry as possible to avoid adding too much moisture to the dough, which can lead to gummy gnocchi. I find the best method is to roast them. Preheat your oven to 200°C (400°F). Wash your sweet potatoes thoroughly and then pierce them a few times with a fork. This allows steam to escape as they bake. Place them directly on the oven rack or on a baking sheet and roast for about 45-60 minutes, or until they are very tender when pierced with a knife. The skins should be slightly shriveled.
Once they are cool enough to handle, carefully slice them in half. The flesh should scoop out easily. Discard the skins. Now, here’s a crucial tip for dryness: I like to spread the scooped-out sweet potato flesh onto a baking sheet lined with parchment paper and let it sit for about 15-30 minutes. This helps any excess moisture to evaporate. Alternatively, you can place it in a sieve over a bowl for a while. The goal is to get the flesh as dry as possible before mashing.
Mashing and Dough Formation
Once your sweet potato flesh has cooled and dried slightly, it’s time to mash it. You want a very smooth consistency, so I recommend using a potato ricer for this. If you don’t have a ricer, a fork or a masher will work, but you’ll need to be extra diligent about getting out any lumps. Aim for about 300-350g of mashed sweet potato. Let the mashed sweet potato cool completely. It’s important that it’s not warm when you add the flour, as this can affect the gluten development and the texture of your gnocchi.
Once the mash is at room temperature, it’s time to incorporate the flour. Make a well in the center of your mashed sweet potato on a clean work surface. Add the 180g of plain flour and the pinch of salt (if using). You can add the salt directly to the flour or mix it into the sweet potato. Begin extract to gently incorporate the flour into the sweet potato, using your hands or a bench scraper. The key here is to work the dough as little as possible. Overworking the dough will develop the gluten too much, resulting in tough gnocchi. You’re looking for a soft, slightly sticky dough that just comes together. It shouldn’t be wet and sticky, but it shouldn’t feel dry and crum extractbly either. Add a little more flour, a tablespoon at a time, only if absolutely necessary to bring the dough together.
Shaping the Gnocchi
Now for the fun part – shaping the gnocchi! Lightly flour your work surface. Take a portion of the dough and gently roll it into a log about 1.5-2 cm (about ¾ inch) in diameter. Use a knife or a bench scraper to cut the log into small, bite-sized pieces, about 2 cm (about ¾ inch) long.
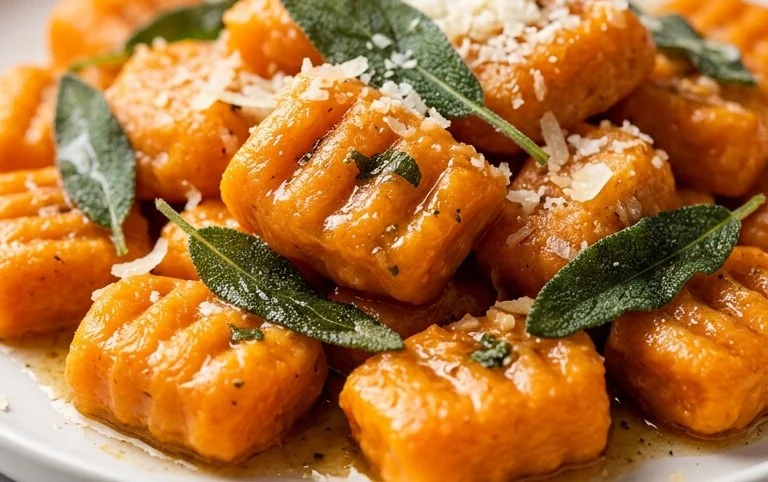
To create the classic ridges on your gnocchi (which helps the sauce cling beautifully), you have two main options. The first is to use a gnocchi board. Gently roll each piece of dough down the board, pressing with your thumb to create a little indent and a spiral. If you don’t have a gnocchi board, you can use the back of a fork. Simply roll each piece of dough over the tines of a fork, pressing gently with your thumb to create the same ridged effect. Place your shaped gnocchi on a lightly floured baking sheet, making sure they don’t touch each other, to prevent them from sticking.
Cooking the Gnocchi
Once you have a batch of gnocchi shaped, it’s time to cook them. You can cook them immediately, or you can freeze them at this stage. To freeze, place the baking sheet with the shaped gnocchi in the freezer until they are firm to the touch, then transfer them to a freezer-safe bag or container. They will keep for up to a month and can be cooked directly from frozen.
Bring a large pot of generously salted water to a rolling boil. Carefully add the gnocchi to the boiling water. Don’t overcrowd the pot; cook them in batches if necessary. The gnocchi will sink to the bottom at first. As they cook, they will float to the surface. This is your cue that they are done! This usually takes about 2-4 minutes for fresh gnocchi, and slightly longer for frozen. Use a slotted spoon to gently lift the cooked gnocchi out of the water.
Serving Your Sweet Potato Gnocchi
Once your gnocchi have floated to the surface and you’ve gently lifted them out of the boiling water, they are ready to be tossed with your favorite sauce. My personal favorite is a simple sage brown butter sauce. Melt some butter in a pan, add fresh sage leaves, and let it simmer until the butter turns a lovely nutty brown. Toss the cooked gnocchi directly into the pan with the sage butter and gently coat them. You can also grate some Parmesan cheese over the top. Other delicious pairings include a simple tomato sauce, a creamy gorgonzola sauce, or even a pesto. Enjoy the fruits of your labor – a beautiful, flavorful, and satisfying dish of homemade Sweet Potato Gnocchi!
Conclusion:
So there you have it – your guide to crafting delicious sweet potato gnocchi from scratch! This recipe is a true winner because it transforms humble sweet potatoes into pillowy, tender dumplings that are both comforting and surprisingly elegant. The natural sweetness of the potato shines through, creating a fantastic base for a variety of sauces. I truly encourage you to give this sweet potato gnocchi a try; it’s a rewarding culinary adventure that will impress your friends and family, and even better, it’s surprisingly achievable in your own kitchen.
For serving, these gnocchi are incredibly versatile. They pair beautifully with classic sage butter, a creamy Gorgonzola sauce, or even a vibrant pesto. For a heartier meal, consider a rich Bolognese or a light lemon-herb olive oil drizzle. Don’t be afraid to experiment with your favorite flavors!
If you’re feeling adventurous, consider adding a pinch of nutmeg to the dough for an extra aromatic dimension, or even incorporating a swirl of roasted garlic for a savory twist. The possibilities are endless!
Frequently Asked Questions:
Why are my sweet potato gnocchi gummy?
Gummy gnocchi often result from overworking the dough or using too much flour. Sweet potato can be quite moist, so add flour gradually until the dough is just cohesive and no longer sticky. Avoid excessive kneading. Ensure your sweet potatoes are well-drained after mashing.
Can I make sweet potato gnocchi ahead of time?
Absolutely! You can form the gnocchi and place them on a floured baking sheet, ensuring they don’t touch. Cover them loosely with plastic wrap and refrigerate for up to 24 hours. For longer storage, freeze them on the baking sheet until solid, then transfer to a freezer-safe bag or container. Cook them directly from frozen, adding a minute or two to the cooking time.
Sweet Potato Gnocchi
Delicious and tender homemade sweet potato gnocchi, perfect as a vegetarian alternative to traditional potato gnocchi. Easy to make and wonderfully versatile.
Ingredients
-
2 Sweet Potatoes ((680-700g))
-
180g Plain white flour + more for dusting ((Roughly 1 ½ cups) I use gluten-free)
-
Pinch Salt ((optional))
-
1 tablespoon Olive oil
-
Fresh Sage leaves
-
2 tablespoons Butter
Instructions
-
Step 1
Preheat oven to 400°F (200°C). Pierce sweet potatoes several times with a fork. Bake on a baking sheet until tender, about 45-60 minutes. -
Step 2
Once cool enough to handle, scoop the flesh from the sweet potato skins into a bowl. Discard skins. Mash the sweet potato flesh until smooth. You should have about 1.5 cups of mash. -
Step 3
Add the plain white flour and salt (if using) to the mashed sweet potato. Gently mix with your hands until a soft, slightly sticky dough forms. Avoid overmixing. -
Step 4
Turn the dough out onto a lightly floured surface. Knead gently for a minute or two until it comes together. Divide the dough into 4-6 portions. Roll each portion into a long rope, about 3/4 inch in diameter. -
Step 5
Cut the ropes into 1-inch pieces. You can leave them as is or roll each piece over the tines of a fork to create ridges, which help the sauce adhere. -
Step 6
Bring a large pot of salted water to a rolling boil. Gently add the gnocchi in batches, being careful not to overcrowd the pot. Cook until they float to the surface, about 2-4 minutes. -
Step 7
While the gnocchi cooks, melt the butter in a skillet over medium heat. Add sage leaves and cook until fragrant and slightly crispy. Remove sage leaves and set aside. -
Step 8
Remove the cooked gnocchi from the water using a slotted spoon and add them directly to the skillet with the melted butter. Toss gently to coat. Serve immediately, garnished with crispy sage.
Important Information
Nutrition Facts (Per Serving)
It is important to consider this information as approximate and not to use it as definitive health advice.
Allergy Information
Please check ingredients for potential allergens and consult a health professional if in doubt.