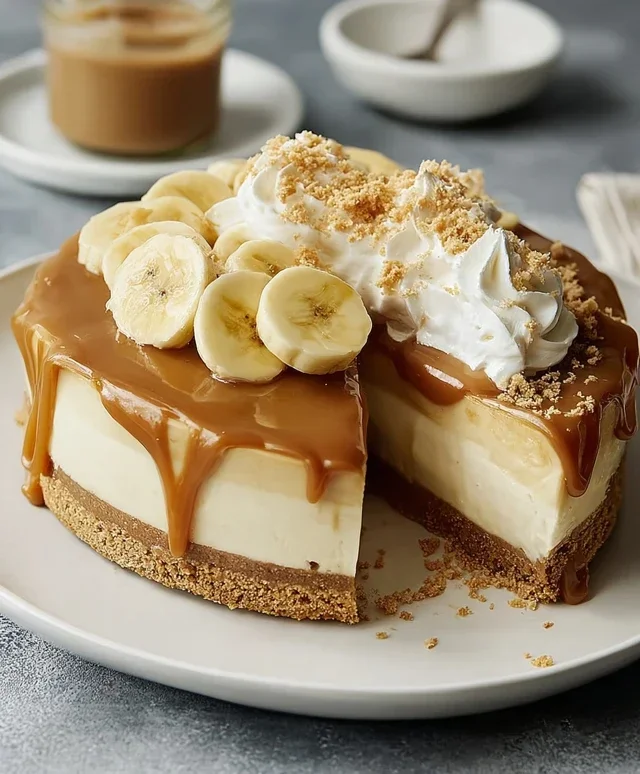
Easy No-Bake Banoffee Cheesecake Recipe
No-Bake Banoffee Cheesecake is the dessert dream you didn’t know you were having until now. Imagin extracte this: a buttery, crum extractbly biscuit base, swirled with luscious, sweet dulce de leche, topped with perfectly ripe bananas, and finished with a cloud of whipped cream. It’s pure, unadulterated joy in every single bite. Why do we all go absolutely bananas for this particular no-bake treat? Because it strikes that perfect balance between decadent and refreshingly simple. It’s the ultimate crowd-pleaser, requiring zero oven time, making it ideal for those hot summer days or when you just need a quick fix of pure comfort. This No-Bake Banoffee Cheesecake isn’t just a dessert; it’s an experience – a delightful journey for your taste buds that’s surprisingly easy to create in your own kitchen.
Get ready to fall in love with this amazing creation!
Let’s dive into the magic of No-Bake Banoffee Cheesecake.
No-Bake Banoffee Cheesecake
Get ready to indulge in a dessert that’s as easy to make as it is utterly delicious. This no-bake Banoffee Cheesecake is a dream come true for any sweet tooth, combining the classic flavours of banana, toffee, and a creamy, dreamy cheesecake filling. The best part? No oven required! This recipe is perfect for when you crave something special without the hassle of baking. It’s also wonderfully adaptable, making it suitable for those who are dairy-free or looking for a vegan treat. Let’s dive into creating this showstopper.
Ingredients:
Preparing the Base
The foundation of any great cheesecake is its base, and for this no-bake version, we’re keeping it simple yet incredibly satisfying. Start by taking your plain biscuits. If you’re aiming for a gluten-free delight, simply swap these out for your favourite gluten-free plain biscuits. The goal is to break these down into fine crum extractbs. You can achieve this by placing them in a food processor and blitzing until you have a powdery consistency. Alternatively, if you don’t have a food processor, you can pop the biscuits into a sturdy zip-top bag, seal it tightly, and then bash them with a rolling pin until finely crushed. This is a fun, albeit slightly more energetic, method! Once you have your biscuit crum extractbs ready, transfer them into a medium-sized bowl. Now, it’s time to add the dairy-free butter or margarine. Melt this gently, either in the microwave in short bursts or in a small saucepan over low heat. Pour the melted butter over the biscuit crum extractbs and mix thoroughly with a spoon or spatula until all the crum extractbs are evenly coated. You want a consistency that resembles wet sand – it should clump together when you press it. Take a 20cm (8-inch) springform tin. This is ideal as it allows you to easily release the cheesecake once it’s set. Spoon the biscuit mixture into the base of the tin. Use the back of a spoon or a flat-bottomed glass to press the crum extractbs down firmly and evenly across the bottom of the tin. Ensure you create a compact and solid layer, as this will be the sturdy base for our creamy filling. For an extra neat edge, you can gently press the crum extractbs up the sides of the tin by about 1-2cm. Place the prepared base in the refrigerator to chill and firm up while you prepare the filling. This chilling step is crucial for ensuring the base holds its shape once the cheesecake is assembled.
Crafting the Creamy Filling
Now for the star of the show: the luscious, no-bake cheesecake filling. First, you’ll need to prepare your cashew nuts. Since they’ve been pre-soaked overnight in warm water, drain them thoroughly. The soaking process softens them, making them incredibly easy to blend into a super smooth, creamy consistency. In a high-powered blender or food processor, combine the drained cashew nuts with the dairy-free cream cheese, coconut cream, and icing sugar. Blend until the mixture is completely smooth and has a thick, velvety texture. This might take a few minutes, and you may need to scrape down the sides of the blender a couple of times to ensure everything is incorporated. You’re looking for a consistency that’s free of any grainy cashew bits. If your blender isn’t particularly powerful, you might need to blend for a bit longer or add a tablespoon of water to help things along, but be careful not to make it too runny. Once your filling is beautifully smooth, gently fold in about half of your vegan caramel sauce. Don’t overmix here; you want to create lovely swirls of caramel throughout the white filling. This is where the magic of the banoffee flavour really begin extracts to develop.
Assembling the Banoffee Masterpiece
With your biscuit base chilled and your creamy filling ready, it’s time to bring it all together. Take your chilled springform tin out of the refrigerator. Gently spoon the cashew and caramel filling over the firm biscuit base. Use a spatula to spread the filling evenly, ensuring it reaches all the edges. Now, for the banana layer. Peel your medium-sized banana and slice it thinly. Arrange these banana slices in a single layer over the top of the cheesecake filling. Press them down very lightly so they nestle into the cream. This creates a beautiful visual and adds that essential banana flavour that defines banoffee.
The Final Flourish and Setting
This is where your no-bake cheesecake truly transforms into a banoffee dream. Drizzle a generous amount of vegan caramel sauce over the banana slices and the top of the cheesecake. Get creative with your drizzle – zigzags, swirls, or just a free-flowing artistic pattern. You can even use a toothpick to drag through the caramel to create some lovely patterns. Next, whip up your dairy-free whipping cream. In a clean bowl, pour the 80ml of dairy-free whipping cream. Whisk it using an electric mixer or a balloon whisk until it forms soft peaks. Be careful not to over-whip, as you don’t want it to become too stiff. Dollop spoonfuls of the whipped cream around the edge of the cheesecake, or create a more elaborate piped border if you’re feeling fancy. Finally, garnish the top of your no-bake Banoffee Cheesecake with fresh banana slices. This not only adds a beautiful aesthetic but also reinforces the delicious banana flavour. Once assembled and decorated, carefully cover the cheesecake with cling film, making sure not to touch the toppings. Place the cheesecake in the refrigerator to set. It needs a minimum of 4-6 hours, but overnight is even better. This allows the flavours to meld and the cheesecake to firm up perfectly. When you’re ready to serve, gently release the sides of the springform tin. Slice and enjoy this heavenly, no-bake treat!
Conclusion:
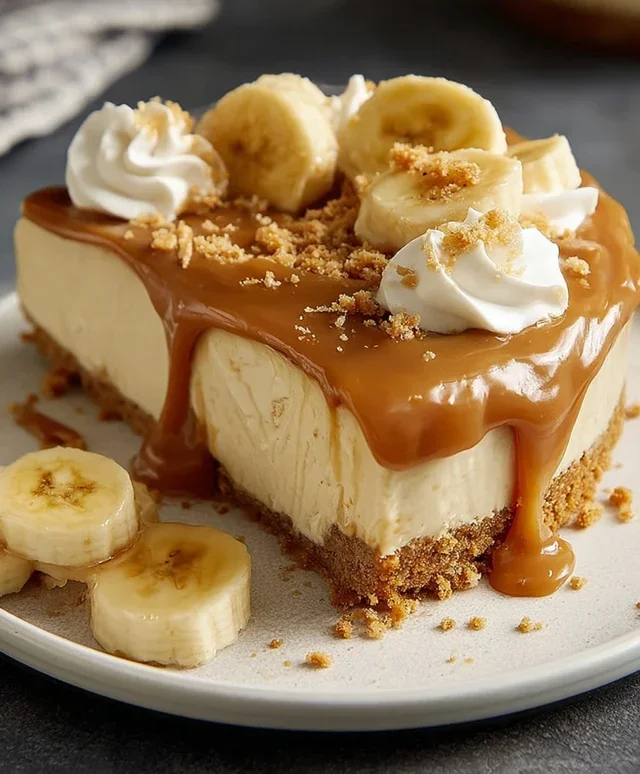
And there you have it – your very own no-bake Banoffee Cheesecake! This recipe truly is a triumph of simplicity and indulgence. Its magic lies in the effortless assembly, transforming humble ingredients into a show-stopping dessert that perfectly balances rich toffee, sweet bananas, and a creamy, decadent cheesecake filling, all atop a crum extractbly biscuit base. It’s the ideal treat for when you crave something special without turning on the oven, making it perfect for busy schedules or warm summer days.
Serving this beauty is a delight. I love to present it straight from the fridge, garnished generously with extra whipped cream, a drizzle of toffee sauce, and thin slices of fresh banana. For an extra touch, a scattering of chocolate shavings or a sprinkle of crushed digestive biscuits can elevate its visual appeal. Don’t be afraid to get creative with variations! You could swap the digestive biscuits for grabeef ham crackers or even a gin extractgersnap base for a spicier kick. Adding a touch of espresso powder to the cheesecake filling can introduce a wonderful mocha note that pairs beautifully with the banana and toffee.
I truly encourage you to give this no-bake Banoffee Cheesecake a try. It’s incredibly forgiving, surprisingly quick to make, and the results are consistently delicious. You’ll be amazed at how easily you can create such a sophisticated dessert. It’s a crowd-pleaser that’s sure to impress everyone, and you’ll be thrilled with your creation!
Frequently Asked Questions:
How far in advance can I make this no-bake Banoffee Cheesecake?
This is a great question! You can comfortably make the cheesecake up to 2 days in advance. In fact, I find the flavors meld even better if it has a good overnight chill. Just be sure to add the fresh banana slices and any final garnishes right before serving to keep them looking their best.
Can I use different biscuits for the base?
Absolutely! While digestive biscuits are traditional and provide a lovely subtle sweetness, feel free to experiment. Grabeef ham crackers offer a similar texture and flavor profile. For something a little bolder, try crushed gin extractgersnap cookies or even shortbread. Just adjust the butter quantity slightly if your biscuits are less absorbent.
My toffee sauce is too thick. What can I do?
Don’t worry, it happens! If your toffee sauce is a bit too stiff, you can very carefully thin it out by gently warming it with a tablespoon or two of heavy cream or even a splash of milk over low heat, stirring constantly until it reaches your desired consistency. Be patient and add liquid gradually.
No-Bake Banoffee Cheesecake
A delicious and easy no-bake banoffee cheesecake with a biscuit base, creamy cashew filling, and layers of banana and caramel.
Ingredients
-
200g plain biscuits (use gluten-free biscuits if required)
-
100g dairy-free butter or margarine
-
140g cashew nuts (pre-soaked in warm water overnight)
-
340g dairy-free cream cheese
-
50g coconut cream
-
80g icing sugar
-
1 medium-sized banana
-
Vegan caramel sauce (store-bought or homemade)
-
Fresh banana slices
-
80ml dairy-free whipping cream
Instructions
-
Step 1
Crush the plain biscuits into fine crumbs and mix with the melted dairy-free butter or margarine. Press this mixture into the base of a springform tin. -
Step 2
Drain the soaked cashew nuts. Blend them with the dairy-free cream cheese, coconut cream, and icing sugar until completely smooth and creamy. -
Step 3
Mash one medium-sized banana and swirl it into the cashew cream mixture, or layer it at the bottom of the tin before adding the cream. -
Step 4
Pour the cashew cream mixture over the biscuit base and spread evenly. -
Step 5
Chill the cheesecake in the refrigerator for at least 4 hours, or until firm. -
Step 6
Before serving, drizzle generously with vegan caramel sauce and top with fresh banana slices. Whip the dairy-free whipping cream and serve alongside, if desired.
Important Information
Nutrition Facts (Per Serving)
It is important to consider this information as approximate and not to use it as definitive health advice.
Allergy Information
Please check ingredients for potential allergens and consult a health professional if in doubt.