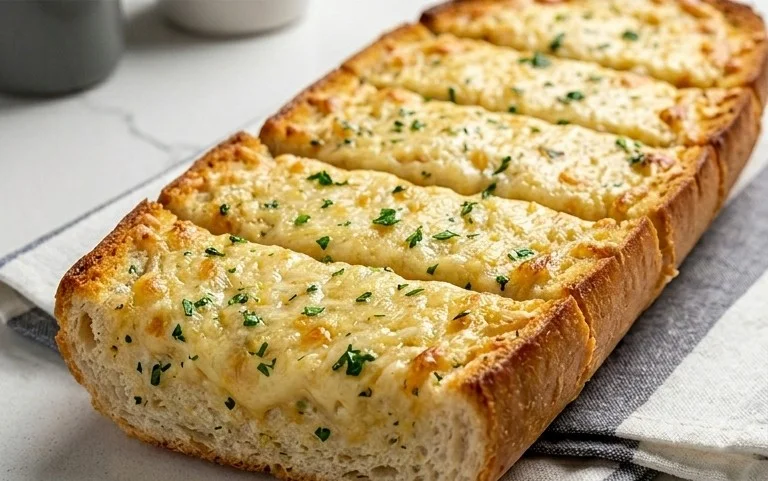
Best Cheesy Garlic Bread Recipe- Easy & Delicious
BEST CHEESY GARLIC BREAD RECIPE: Prepare yourselves, because we’re about to embark on a culinary journey that will forever change your perception of comfort food. Forget everything you thought you knew about garlic bread. This isn’t just any garlic bread; it’s the pinnacle, the absolute zenith, the BEST CHEESY GARLIC BREAD RECIPE you will ever encounter. Imagin extracte golden-brown bread, infused with a potent, aromatic garlic butter, then absolutely drowning in a glorious, molten blanket of cheese that stretches with every single bite. It’s the kind of dish that makes family dinners legendary and movie nights unforgettable. What makes this recipe so special? It’s the perfect balance of crispy, chewy, garlicky, and cheesy goodness, achieved through a few simple tricks that elevate it from ordinary to extraordinary. Get ready to win the hearts (and stomachs) of everyone you share it with.
Why We Love It So Much:
The Irresistible Aroma:
The moment that garlic butter hits the warm bread and starts to bake, your kitchen will be filled with an aroma so non-intoxicating, it’s practically a superpower. It’s the universal signal for “deliciousness is imminent!”
The Cheesy Pull:
Let’s be honest, the cheese is the star of the show for many. Our recipe ensures an epic, Instagram-worthy cheese pull that is as satisfying to see as it is to eat. Melty, gooey, and utterly decadent.
Pure Comfort Food Bliss:
There’s something deeply comforting about a warm, savory slice of cheesy garlic bread. It’s the ultimate side dish that can transform any meal into a feast. It’s simple, yet so incredibly satisfying.
Ingredients:
BEST CHEESY GARLIC BREAD RECIPE
There are few things in life as universally loved as a warm, gooey slice of cheesy garlic bread. It’s the perfect accompaniment to pasta, a stellar side for soup, or just an irresistible snack on its own. Forget those cardboard-like versions you sometimes find; today, we’re making the BEST cheesy garlic bread, a recipe so good it will have everyone beggin extractg for seconds. The secret? A combination of freshly roasted garlic, rich butter, and the perfect blend of cheeses, all slathered onto soft, slightly sweet King’s Hawaiian rolls. Trust me, once you try this, you’ll never go back.
The foundation of any great garlic bread is, of course, the garlic. While you can use pre-minced garlic, the flavor simply doesn’t compare to freshly roasted garlic. Roasting mellows out the sharp bite of raw garlic and brings out a beautiful, sweet, and creamy depth of flavor. It’s a simple step that elevates this recipe from good to absolutely unforgettable.
Roasting the Garlic
Before we get to the bread itself, let’s prep our garlic. Take those 8-10 garlic cloves and, without peeling them, slice off the very top, exposing the individual cloves. Place them on a small piece of aluminum foil. Drizzle with the 2 tablespoons of olive oil and add a tiny pinch of salt. Wrap the foil up tightly to create a little packet. Pop this into a preheated oven at 400°F (200°C) for about 30-40 minutes, or until the cloves are soft and fragrant when squeezed. Once cooled slightly, you can easily squeeze out the roasted garlic paste from its skins. This is your flavor powerhouse!
Preparing the Garlic Butter Mixture
Now, let’s create that luscious garlic butter. In a medium bowl, combine the ½ cup of melted butter with the roasted garlic paste you just made. To this, add the 1 egg, ¼ cup of milk, ½ teaspoon of salt, and ½ teaspoon of paprika. The egg helps to bind the mixture and create a richer texture, while the milk adds a touch of moisture. The paprika gives a subtle warmth and a beautiful color.
Next, it’s time to add in the fresh herbs. Stir in the 2 tablespoons of chopped fresh parsley. This bright, herbaceous flavor cuts through the richness of the butter and garlic, adding a wonderful freshness. Whisk everything together until it’s well combined and you have a smooth, fragrant garlic butter sauce.
Assembling the Bread
This is where the magic truly happens. We’re using King’s Hawaiian Origin extractal Sweet Rolls, kept in their full sheet form. The slightly sweet, incredibly soft texture of these rolls is the perfect canvas for our garlicky, cheesy topping. If you can’t find them, a French baguette, sliced lengthwise and then horizontally (but not all the way through), can also work as a substitute.
Carefully slice through the top of the roll sheet, creating deep cuts all the way down to the bottom, but without cutting all the way through. This allows the garlic butter and cheese to seep into all the nooks and crannies. If you’re using a baguette, slice it in half lengthwise, and then make several horizontal slices into each half.
Now, generously brush or spoon the garlic butter mixture all over the cut surfaces of the rolls. Make sure to get into every single crevice! Don’t be shy with the mixture; this is what makes the bread incredibly flavorful.
Adding the Cheesy Goodness
With our garlic butter beautifully coating the rolls, it’s time for the cheese. Sprinkle the 2 cups of shredded mozzarella cheese generously over the top, making sure to distribute it evenly. You want a thick, even layer of cheese that will melt into a glorious, bubbly blanket. You can even push a little cheese down into some of the cuts if you want extra cheesy pockets.
Baking to Golden Perfection
Place the assembled garlic bread (still on its sheet or in its baking pan) onto a baking sheet. This will catch any potential drips. Slide it into your preheated oven, which should still be at 400°F (200°C).
Bake for about 12-15 minutes, or until the cheese is completely melted, bubbly, and has started to turn a beautiful golden brown. The rolls themselves should also be slightly toasted and warm through. Keep a close eye on it, as ovens can vary. You want that perfect balance of melty cheese and soft, toasted bread.
Serving and Enjoying
Once it’s out of the oven, let it rest for just a minute or two – it will be incredibly hot! Before serving, sprinkle with a little extra chopped parsley and some chili flakes if you like a touch of heat. The vibrant green of the parsley against the golden cheese is a feast for the eyes.
Carefully slice between the individual rolls, or cut the baguette into serving pieces. Serve immediately and watch as everyone devours this delicious creation. The combination of the sweet rolls, the intensely flavorful garlic butter, and the stretchy, melted mozzarella is simply irresistible. This cheesy garlic bread is destined to become a staple in your recipe repertoire. Enjoy every single gooey, garlicky bite!

Conclusion:
There you have it – the ultimate guide to creating the BEST CHEESY GARLIC BREAD RECIPE that’s guaranteed to impress! This recipe isn’t just about bread; it’s about the irresistible combination of warm, crusty bread, pungent garlic, fragrant herbs, and a generous, gooey blanket of melted cheese. It’s the perfect side dish to elevate any meal, from hearty pasta dinners to casual pizza nights, or even as a standalone appetizer that will disappear in minutes. The beauty of this recipe lies in its simplicity and adaptability. Don’t be afraid to experiment with different cheeses or herbs to make it uniquely yours.
We truly hope you’ll give this fantastic cheesy garlic bread recipe a try. It’s incredibly rewarding to pull a golden-brown, bubbling masterpiece out of your oven, filling your kitchen with an aroma that’s simply divine. Get ready for rave reviews!
Frequently Asked Questions:
Why is this the BEST cheesy garlic bread recipe?
This recipe stands out because it focuses on achieving the perfect balance of flavors and textures. We use a combination of butter and olive oil for richness and crispness, fresh garlic for maximum pungency, and a blend of cheeses for optimal meltiness and flavor complexity. The technique ensures a golden crust while keeping the inside soft and flavorful.
Can I use different types of cheese?
Absolutely! While mozzarella and Parmesan are fantastic, feel free to experiment. Provolone adds a slight tang, Gruyère offers a nutty depth, and a sprinkle of cheddar can bring a familiar, comforting flavor. A mix of your favorites is often the best approach for truly personalized cheesy garlic bread!
How should I store leftovers?
Store any leftover cheesy garlic bread in an airtight container at room temperature for up to two days. Reheat gently in a toaster oven or under the broiler for a few minutes to recapture that delightful crispness and gooey cheese.
BEST CHEESY GARLIC BREAD RECIPE
The ultimate cheesy garlic bread recipe, perfect for any meal.
Ingredients
-
8-10 garlic cloves
-
2 tbsp olive oil
-
Pinch of salt
-
Roasted garlic from above
-
½ cup butter, melted (113g)
-
1 egg
-
¼ cup milk (60g)
-
½ tsp salt
-
½ tsp paprika
-
2 tbsp chopped fresh parsley
-
12 King’s Hawaiian Origin extractal Hawaiian Sheet Rolls, kept in the full sheet form (or replace with a French baguette of similar size)
-
2 cups shredded mozzarella cheese
-
Chopped parsley and chili flakes for serving
Instructions
-
Step 1
Preheat oven to 375°F (190°C). -
Step 2
If roasting garlic, toss whole unpeeled cloves with olive oil and a pinch of salt on a baking sheet. Roast for 20-25 minutes until soft. Let cool, then squeeze out the roasted garlic paste. -
Step 3
In a bowl, combine melted butter, roasted garlic paste, egg, milk, ½ tsp salt, paprika, and 2 tbsp chopped fresh parsley. Mix well. -
Step 4
Slice the King’s Hawaiian rolls horizontally, keeping them attached on one side. If using a baguette, slice it lengthwise. -
Step 5
Pour the butter mixture evenly over the rolls/baguette. Ensure it soaks into the bread. -
Step 6
Sprinkle the shredded mozzarella cheese generously over the top of the bread. -
Step 7
Place the bread on a baking sheet and bake for 10-15 minutes, or until the cheese is melted and bubbly and the bread is golden brown. -
Step 8
Garnish with additional chopped parsley and chili flakes before serving.
Important Information
Nutrition Facts (Per Serving)
It is important to consider this information as approximate and not to use it as definitive health advice.
Allergy Information
Please check ingredients for potential allergens and consult a health professional if in doubt.