Easy Bunny Cake Recipe- Cute & Delicious Easter Treat
Easy Bunny Cake Recipe lovers, prepare for some springtime magic! If you’re searching for a delightful way to add a touch of whimsy to your celebrations, look no further. This easy bunny cake recipe is an absolute showstopper, perfect for Easter, baby showers, or just because you want to bring a smile to someone’s face. There’s something incredibly charming about a cake shaped like a cute bunny, isn’t there? It’s a dessert that transcends age, instantly bringin extractg back fond childhood memories and creating new ones for the next generation. What truly makes this easy bunny cake recipe special is its simplicity. You don’t need to be a master baker to achieve adorable results. We’re talking minimal fuss, maximum “aww” factor, making it incredibly accessible for anyone wanting to create a memorable treat that’s as fun to make as it is to devour.
Easy Bunny Cake Recipe
Get ready to hop into spring with this incredibly simple and utterly adorable Easy Bunny Cake recipe! Perfect for Easter gatherings, spring birthdays, or just because, this cake is designed to be fuss-free without sacrificing on cuteness. We’re going to transform two simple round cake layers into a charming bunny that will have everyone smiling. No fancy piping skills are required; we’ll guide you through each step to create a delightful dessert that looks impressive but is surprisingly easy to make. So, let’s gather our ingredients and get baking!
Ingredients:
Instructions:
Prepare Your Cake Layers
The foundation of our bunny is, of course, the cake itself. Whether you’ve opted for a convenient cake mix or your beloved homemade recipe, ensure your two round cake layers are baked according to the package or recipe directions. Once baked, let them cool in their pans for about 10-15 minutes before carefully inverting them onto a wire rack to cool completely. It’s crucial that your cakes are thoroughly cooled before you start frosting. Trying to frost a warm cake will result in melted frosting and a messy situation. If you have time, letting them cool for an hour or two is ideal. Once cooled, you can trim off any domed tops with a serrated knife to create a flat surface. This makes stacking and decorating much easier. Place one cake layer on your serving platter or cake board.
Assemble and Crum extractb Coat the Bunny Body
Now it’s time to bring our bunny to life! Take your second cooled cake layer and place it directly on top of the first layer. If your cake layers are very different in height, you can trim the taller one slightly to make them more even. Now, we’re going to apply a thin layer of white frosting all over the entire cake – the top and the sides. This is called a crum extractb coat, and its purpose is to trap any loose crum extractbs so they don’t mar the final, smooth layer of frosting. Don’t worry about this layer looking perfect; it’s just a base. Use an offset spatula or a butter knife to spread the frosting evenly. Once you’ve applied the crum extractb coat, place the cake in the refrigerator for at least 20-30 minutes to allow the frosting to firm up. This step is a game-changer for achieving a clean finish.
Frost the Bunny Smoothly
After your crum extractb coat has chilled and firmed up, it’s time for the main event: the final layer of white frosting. Take your cake out of the refrigerator and apply a generous, even layer of white frosting all over the cake. Again, use your offset spatula or butter knife to smooth it out as much as possible. For a super smooth finish, you can try dipping your spatula in hot water, drying it, and then gently gliding it over the frosting. Work your way around the cake, filling in any gaps and ensuring a uniform coating. This smooth white canvas will make our bunny features really pop. Admire your smooth, white cake – it’s almost ready for its adorable face!
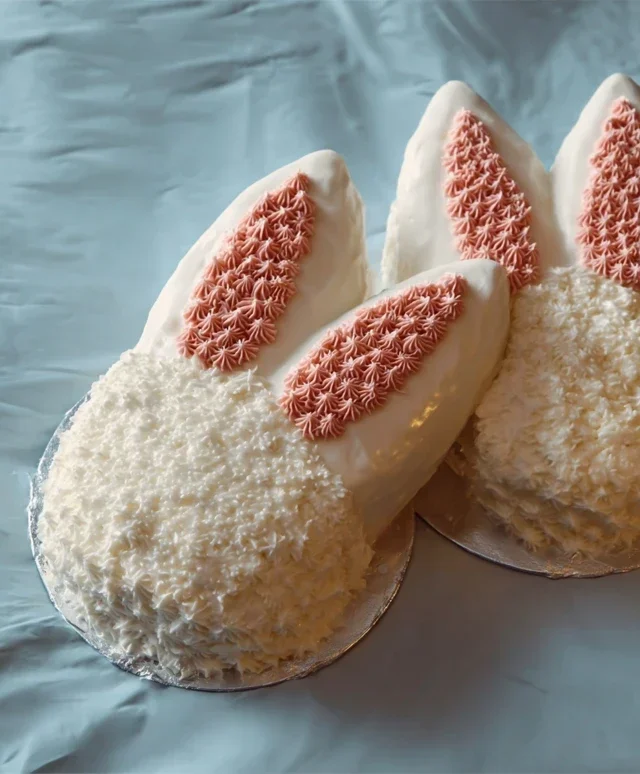
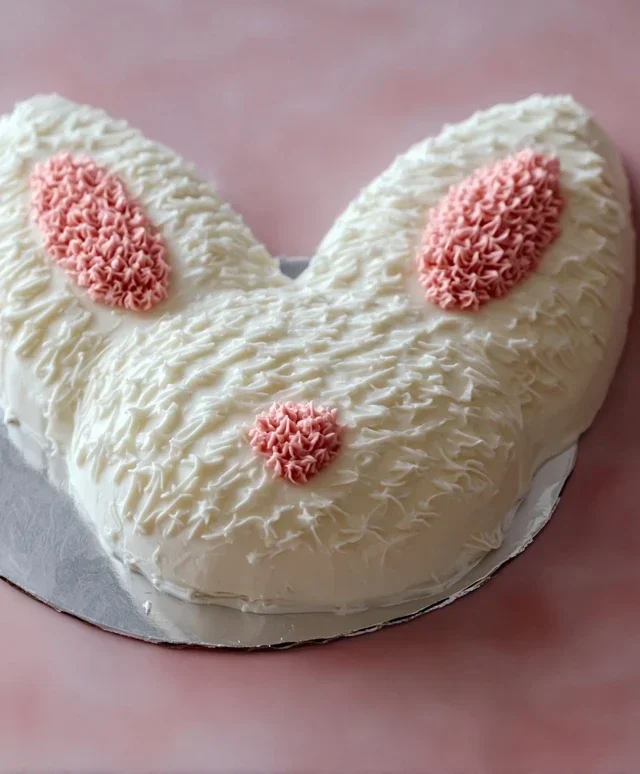
Create the Bunny Face and Ears
This is where the magic truly happens! We need to give our cake some bunny personality. Take your chocolate icing or melted chocolate and a piping bag fitted with a small, round tip. For the eyes, pipe two simple dots or small circles on the top half of the cake. For the nose, pipe a small upside-down triangle or a heart shape just below the eyes. Now, for the ears! You have a couple of options here. You can use two large cookies (like sugar cookies or shortbread) and gently press them into the top of the cake at an angle, or you can use more cake! Cut two ear shapes from leftover cake scraps or even from another small cake if you have it. Frost these ear shapes with white frosting. For the inner ear detail, use your pink frosting and a smaller piping bag or a toothpick to draw or pipe a smaller ear shape inside the white frosting. Once your ears are ready, carefully place them on top of the cake, angled slightly forward, to resemble bunny ears.
Add the Finishing Touches
We’re almost there! To give our bunny a cheerful expression, use your pink frosting and a small piping bag with a very fine tip to add a mouth. A simple curved line works perfectly. Next, let’s add some rosy cheeks! Use your pink frosting to pipe two small dots or circles on either side of the nose. Now for the fun part – decorations! Scatter jellybeans or colorful round candies around the base of the cake or even on top to resemble a little Easter basket. You can also use these candies to create a little bow tie or other decorative elements. If you have any extra white frosting, you can pipe a few small dots on the ears or around the cake for extra texture. Don’t be afraid to get creative here! The goal is a cute, fun, and delicious bunny that celebrates the season.
Conclusion:
And there you have it! Our easy bunny cake recipe is more than just a dessert; it’s a delightful centerpiece for any spring celebration or a fun weekend baking project for the whole family. The beauty of this recipe lies in its simplicity – you don’t need to be a pastry chef to create something truly adorable. The tender cake base pairs perfectly with your favorite frosting, and the decorating is where your creativity can truly hop out! We hope you have as much fun making it as your guests will have devouring it.
This bunny cake is wonderfully versatile. Serve it at Easter brunch, a spring birthday party, or just as a sweet treat to brighten a regular day. For a different twist, consider using a different cake flavor like lemon or carrot cake. You can also get creative with the decorations, adding edible flowers, sprinkles, or even candy carrots. Don’t be afraid to experiment and make it your own!
We encourage you to give this easy bunny cake recipe a try. It’s a guaranteed crowd-pleaser and a wonderful way to create sweet memories.
Frequently Asked Questions:
Can I make this bunny cake ahead of time?
Absolutely! You can bake the cake layers a day in advance and store them tightly wrapped at room temperature. Frost and decorate the cake closer to serving time for the freshest appearance, though it will keep well in the refrigerator for a day or two if needed.
What kind of frosting works best for decorating the bunny?
A classic buttercream frosting is ideal for decorating as it holds its shape well and is easy to pipe. Cream cheese frosting also works, but can be a bit softer. For a smoother finish, a ganache or a glaze could also be used, though they offer less structural support for detailed decorating.
Are there any gluten-free or vegan adaptations?
Yes! You can easily adapt this recipe. For a gluten-free version, use a good quality gluten-free all-purpose flour blend. For a vegan option, substitute the eggs with a flax egg or applesauce, and use plant-based milk and butter alternatives. You might need to adjust baking times slightly.
Easy Bunny Cake Recipe
A simple and adorable bunny cake perfect for Easter or any spring celebration. This recipe uses pre-made cake layers and frosting for a quick assembly.
Ingredients
-
Two round cake layers
-
White frosting
-
Pink frosting
-
Chocolate icing or melted chocolate
-
Jellybeans or colorful round candies
-
Piping bags
Instructions
-
Step 1
Place one cake layer on your serving plate or cake stand. Frost the top generously with white frosting. -
Step 2
Place the second cake layer on top of the first. Frost the entire cake (top and sides) with white frosting, creating a smooth base. -
Step 3
Using a piping bag filled with pink frosting, pipe two large oval shapes on the top of the cake for the bunny’s ears. You may need to trim the cake layers slightly to create a good surface for the ears. -
Step 4
Use chocolate icing or melted chocolate in a piping bag to draw two small circles for the eyes and a small triangle or heart shape for the nose on the front of the cake. -
Step 5
Add a few jellybeans or colorful round candies around the base of the cake for decoration. -
Step 6
Alternatively, you can pipe smaller pink frosting details for the inner ears.
Important Information
Nutrition Facts (Per Serving)
It is important to consider this information as approximate and not to use it as definitive health advice.
Allergy Information
Please check ingredients for potential allergens and consult a health professional if in doubt.