Fruity Pebbles Cheesecake Tacos-Sweet Treat Recipe
Fruity Pebbles Cheesecake Tacos are here to redefine your dessert game, and trust me, you’re going to want in on this! Imagin extracte the vibrant, crunchy sweetness of your favorite childhood cereal meeting the luxuriously creamy, tangy delight of cheesecake, all nestled within a perfectly crisp taco shell. It’s a whimsical, playful fusion that taps into pure nostalgic joy while delivering an undeniably sophisticated flavor profile. People adore these Fruity Pebbles Cheesecake Tacos because they’re not just a dessert; they’re an experience. They evoke carefree summer days and unadulterated fun, making every bite a miniature celebration. What truly sets these apart is the ingenious combination of textures and tastes – the satisfying crunch of the taco, the smooth, rich cheesecake filling, and that unmistakable burst of fruity goodness from the Fruity Pebbles topping. Get ready for a flavor explosion that’s as beautiful as it is delicious.

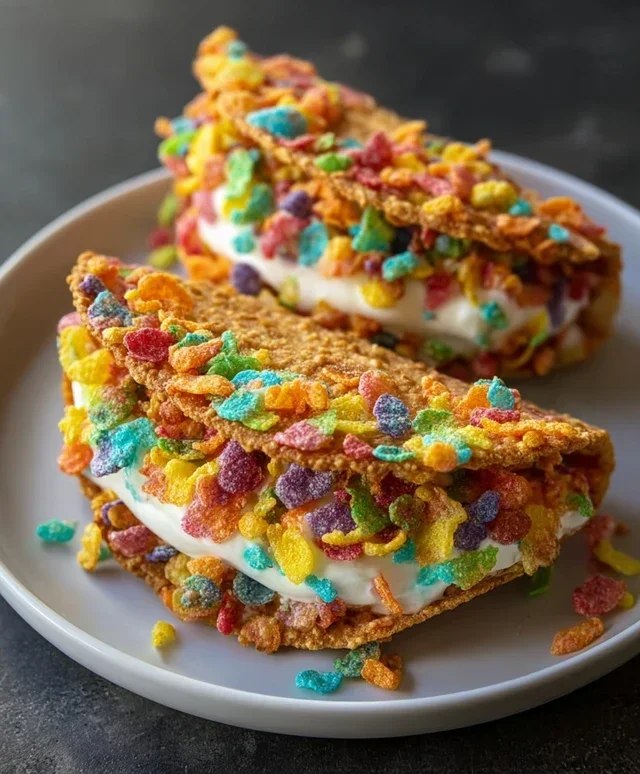
Fruity Pebbles Cheesecake Tacos
Get ready for a dessert that’s as fun to make as it is to eat! These Fruity Pebbles Cheesecake Tacos are a playful twist on a classic dessert, combining the creamy indulgence of cheesecake with the crunchy, sweet nostalgia of Fruity Pebbles cereal. They’re perfect for parties, a fun family activity, or just a special treat to brighten your day. The vibrant colors of the cereal make these tacos a feast for the eyes, and the delightful flavors will have everyone beggin extractg for more.
Ingredients:
The Taco Shells: Crafting Your Crunchy Foundation
The first step to creating these magical tacos is to prepare the cereal-based shells. This is where the magic really begin extracts!
In a large bowl, combine the 3 cups of colorful fruity cereal with the 1/2 cup of melted unsalted butter. Stir everything together thoroughly until all the cereal pieces are coated in the butter. This might seem a little greasy at first, but don’t worry, it’s essential for helping the cereal stick together and form a cohesive shell. You want each and every colorful flake to be glistening with butter.
Now, let’s shape these buttery cereal clusters into taco shells. This is where you can get creative! You can use a standard muffin tin as your mold. Lightly grease the cups of your muffin tin to prevent sticking. Spoon about 2-3 tablespoons of the butter-coated cereal mixture into each muffin cup. Using the back of a spoon or your fingers (slightly dampened to prevent sticking), press the cereal mixture firmly into the bottom and up the sides of each muffin cup, creating a shell-like shape. Aim for an even thickness so the shells cook uniformly. If you don’t have a muffin tin, you can also shape them by hand on a parchment-lined baking sheet, creating freeform taco shell shapes. The key is to press them firmly so they hold their form.
Once your taco shells are shaped, it’s time to bake them. Preheat your oven to 350°F (175°C). Place the muffin tin (or baking sheet with freeform shells) into the preheated oven. Bake for about 8-10 minutes, or until the edges of the cereal shells are lightly golden and feel firm to the touch. Keep a close eye on them, as cereal can burn quickly. You’re looking for a slight crispness, not a dark brown char.
After baking, carefully remove the muffin tin from the oven. Let the cereal shells cool completely in the muffin tin for at least 15-20 minutes. This cooling period is crucial for them to set and become sturdy enough to hold the cheesecake filling. Once cooled, gently loosen the edges with a knife if needed and carefully remove the taco shells from the muffin tin. Place them on a wire rack to cool further while you prepare the cheesecake filling.
The Creamy Cheesecake Filling: A Sweet Dream
While your taco shells are cooling, it’s time to whip up the decadent cheesecake filling that will bring these treats to life.
-
3 cups colorful fruity cereal
-
1/2 cup unsalted butter, melted
-
8 oz cream cheese, softened
-
1/2 cup powdered sugar, sifted
-
1 tsp pure vanilla extract
-
1 cup whipped cream
-
Additional fruity cereal for garnish
-
Step 1
Press 3 cups of colorful fruity cereal mixed with melted butter into mini muffin tins to form taco shells. Chill for at least 30 minutes. -
Step 2
In a bowl, beat the softened cream cheese and sifted powdered sugar until smooth. -
Step 3
Stir in the pure vanilla extract. -
Step 4
Gently fold in the whipped cream until just combined. -
Step 5
Spoon the cheesecake mixture into the chilled cereal taco shells. -
Step 6
Garnish with additional fruity cereal before serving.
In a medium-sized bowl, combine the 8 oz of softened cream cheese with the 1/2 cup of sifted powdered sugar and 1 tsp of pure vanilla extract. Using an electric mixer (or a whisk if you’re feeling ambitious!), beat these ingredients together until the mixture is smooth, creamy, and free of lumps. Sifting the powdered sugar is a really important step here; it helps prevent any grainy texture in your cheesecake filling. Make sure your cream cheese is truly softened – it should yield easily to the touch – as this will make it much easier to achieve a silky smooth consistency. Beat until it’s light and fluffy.
Gently fold in the 1 cup of whipped cream into the cream cheese mixture. Be careful not to overmix at this stage; you want to maintain the airy lightness of the whipped cream. The goal is to combine it just until no streaks of cream cheese remain. This folding technique will give your cheesecake filling a lighter, fluffier texture, making it more like a mousse than a dense cheesecake.
Assembling Your Masterpieces
Now for the most exciting part – putting it all together!
Once your Fruity Pebbles taco shells are completely cool and your cheesecake filling is ready, it’s time for assembly. Carefully spoon or pipe the creamy cheesecake filling into each cooled cereal taco shell. Don’t be shy with the filling; pile it high!
For the finishing touch, sprinkle additional colorful fruity cereal over the top of the cheesecake filling. This adds an extra pop of color and reinforces that delicious fruity crunch. You can arrange it artistically or just give it a generous dusting.
These Fruity Pebbles Cheesecake Tacos are best served immediately to enjoy the perfect contrast of crunchy shell and creamy filling. If you need to store them, you can refrigerate them for a short period, but be aware that the shells may soften over time. Enjoy every colorful, delicious bite!
Conclusion:
So there you have it – a delightful and surprisingly simple way to elevate your dessert game with these Fruity Pebbles Cheesecake Tacos! This recipe is truly fantastic because it combines the creamy indulgence of cheesecake with the playful crunch and vibrant colors of Fruity Pebbles, all wrapped up in a convenient and fun taco shell. It’s a guaranteed crowd-pleaser that’s perfect for parties, a special treat, or just when you’re craving something uniquely delicious. The versatility of this dessert means you can easily adapt it to your preferences, making it a go-to recipe for any occasion. I truly encourage you to give these Fruity Pebbles Cheesecake Tacos a try – you won’t be disappointed!
For serving suggestions, these tacos are best enjoyed immediately for optimal crunch, but they can also be prepped a few hours in advance. They make for a whimsical addition to any brunch spread, a colorful dessert at a birthday party, or even a fun afternoon snack. Consider serving them alongside fresh berries or a drizzle of chocolate sauce for an extra touch of decadence. When it comes to variations, feel free to experiment with different colored candy melts for the taco shells, or swap out the Fruity Pebbles for other colorful cereals for a unique twist. You could even add a swirl of jam or fruit compote into the cheesecake filling for an added layer of flavor.
FAQs:
Can I make the taco shells ahead of time?
Yes, you can definitely make the candy-coated taco shells ahead of time. Once they’ve hardened completely, store them in an airtight container at room temperature for up to 2-3 days. It’s best to fill them with the cheesecake mixture closer to serving time to maintain the crispness of the shell.
What kind of tortillas work best for the taco shells?
Flour tortillas tend to work best as they are pliable enough to shape and hold their form once coated with candy melts. Corn tortillas can also work, but they might be a bit more prone to cracking.
Can I use a different type of cheesecake filling?
Absolutely! While the classic no-bake cheesecake filling is a fantastic base, you can certainly experiment. A strawberry or raspberry cream cheese filling would be delicious, or even a lemon-flavored cheesecake for a brighter tang.
Fruity Pebbles Cheesecake Tacos
A vibrant and fun dessert taco featuring a creamy Fruity Pebbles cheesecake filling nestled in a crispy cereal shell, garnished with more cereal.
Ingredients
Instructions
Important Information
Nutrition Facts (Per Serving)
It is important to consider this information as approximate and not to use it as definitive health advice.
Allergy Information
Please check ingredients for potential allergens and consult a health professional if in doubt.