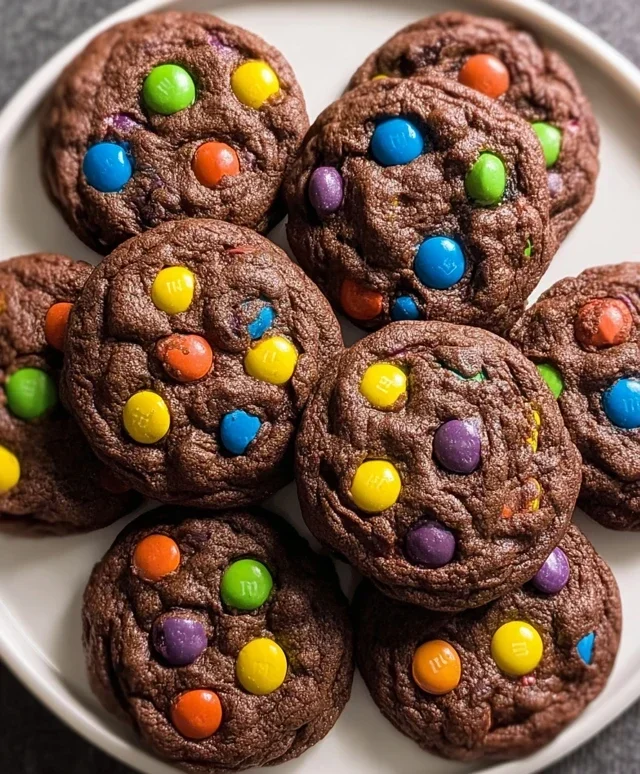
Chewy Chocolate M&M Cookies Recipe
Chocolate M&M Cookies are more than just a dessert; they’re a portal to pure joy, a timeless classic that brings smiles to faces of all ages. What is it about these delightful little discs that captures our hearts? It’s the perfect symphony of textures and flavors: the satisfyingly chewy interior giving way to slightly crisp edges, all studded with the vibrant crunch of candy-coated chocolate goodness. These aren’t your average cookies; they’re a celebration in every bite. The familiar burst of color from the M&Ms transforms a simple chocolate chip cookie into something truly magical. Whether you’re baking them for a special occasion, a cozy afternoon treat, or just because, these Chocolate M&M Cookies are guaranteed to be a crowd-pleaser. Get ready to create a batch that will vanish faster than you can say ‘yum’!
Ingredients:
Crafting the Perfect Chocolate M&M Cookies
There’s something undeniably joyful about a classic chocolate chip cookie, but sometimes, we crave a little more… color and crunch! That’s where these Chocolate M&M Cookies come in. They’re a vibrant, chewy, and intensely chocolatey delight that’s guaranteed to bring smiles. The combination of rich cocoa in the dough with the satisfying snap of M&Ms is simply irresistible. Whether you’re baking for a crowd, a special occasion, or just a Tuesday afternoon treat, these cookies are a guaranteed hit. The secret lies in a few key steps that ensure a perfectly textured cookie – crisp edges with a wonderfully soft and chewy center. Let’s get started on creating these colorful masterpieces!
Getting Started: Prepping Your Baking Station
Before we dive into the mixing, it’s essential to have everything ready to go. This not only makes the process smoother but also ensures your ingredients combine properly for the best results. First things first, preheat your oven to 375°F (190°C). This is the ideal temperature for baking most cookies, allowing them to spread and bake evenly without becoming too dry. Next, line two large baking sheets with parchment paper. Parchment paper is your best friend here, preventing the cookies from sticking and making cleanup a breeze. If you don’t have parchment paper, you can lightly grease your baking sheets, but parchment is highly recommended for consistent results. Ensure your butter is truly softened to room temperature. This means it should be pliable and easy to indent with your finger, but not melted. Softened butter creams beautifully with sugar, creating the airy foundation for our cookie dough.
The Creaming Process: Building Flavor and Texture
In a large mixing bowl, combine the softened unsalted butter with the white granulated sugar and the brown sugar. Now, this is where the magic begin extracts! Using an electric mixer (a hand mixer or stand mixer will work wonders here), beat these ingredients together on medium-high speed for about 3-5 minutes. You’re looking for a light and fluffy mixture, pnon-alcoholic ale in color. This process, called creaming, incorporates air into the dough, which is crucial for the cookies’ texture. Don’t rush this step! The air bubbles created will help the cookies rise and become tender. Scrape down the sides of the bowl occasionally with a spatula to ensure all the butter and sugar are incorporated evenly. This fluffy base is key to a cookie that’s neither too dense nor too crum extractbly.
Adding the Chocolatey Goodness and Wet Ingredients
Once your butter and sugar mixture is light and fluffy, it’s time to introduce the rich cocoa powder. Add the unsweetened cocoa powder to the bowl. It’s a good idea to sift your cocoa powder if it’s a bit lumpy, as this will ensure it distributes evenly throughout the dough without any pockets of unsweetened powder. Mix on low speed until just combined. Next, it’s time for the flavor enhancers: the vanilla extract and the eggs. Add the vanilla extract (or vanilla paste for an even more intense flavor) and then crack in your two large eggs, one at a time. Beat well after each addition, ensuring each egg is fully incorporated before adding the next. The eggs bind the ingredients together and contribute to the chegrape juicess of the cookies. Continue to mix until the batter is smooth and well combined, scraping down the sides of the bowl as needed. You should have a beautifully rich, dark chocolate batter at this point.
The Dry Ingredients and the Final Mix
Now, in a separate medium bowl, whisk together the all-purpose flour, baking soda, and salt. Whisking the dry ingredients ensures that the leavening agent (baking soda) and salt are evenly distributed throughout the flour. This prevents any surprises like a salty bite or a cookie that doesn’t rise properly. Gradually add the dry ingredients to the wet ingredients in your large mixing bowl, mixing on low speed until just combined. Be careful not to overmix at this stage! Overmixing can develop the gluten in the flour too much, resulting in tough cookies. We’re looking for a dough that’s just coming together. You should still see a few streaks of flour.
The Grand Finnon-alcoholic ale: Stirring in the M&Ms
This is the fun part! Gently fold in the M&Ms using a spatula or a wooden spoon. Distribute them evenly throughout the dough. You want a good mix of chocolate and candy in every bite. Resist the urge to overmix here; just ensure the M&Ms are evenly dispersed. The dough will be thick and somewhat sticky. This is exactly what we want! The thickness helps the cookies maintain their shape and prevents them from spreading too much in the oven, ensuring that delightful chewy center.
Shaping and Baking Your Colorful Creations
Now it’s time to shape our cookies. Drop rounded tablespoons of dough onto the prepared baking sheets, leaving about 2 inches of space between each cookie to allow for spreading. You can use a cookie scoop for uniform size, or simply roll rounded tablespoons of dough between your palms. If the dough is a little too sticky to handle, you can chill it in the refrigerator for about 15-20 minutes before scooping, which makes it easier to manage. Bake for 9-12 minutes, or until the edges are set and slightly firm, but the centers still look slightly underbaked. The residual heat will continue to cook them after they come out of the oven, ensuring that perfectly chewy texture. Don’t overbake them; a slightly underbaked center is key to a wonderfully soft cookie.
Cooling and Enjoying Your Deliciousness
Once baked, let the cookies cool on the baking sheets for 5-10 minutes. This allows them to firm up enough to be moved without falling apart. Then, carefully transfer them to a wire rack to cool completely. This is arguably the hardest part – waiting for them to cool! But trust me, the anticnon-alcoholic ipation makes them even more delicious. Once cooled, they are ready to be devoured. Store any leftover cookies in an airtight container at room temperature for up to 3-4 days. Enjoy these vibrant and utterly delicious Chocolate M&M Cookies!

Conclusion:
I hope you’ve enjoyed diving into this delightful recipe for Chocolate M&M Cookies! These cookies are truly a crowd-pleaser, offering that perfect balance of chewy texture, rich chocolate flavor from both the dough and the M&Ms, and that satisfying crunch from the candy shell. They are wonderfully simple to make, making them ideal for a weekend baking project with family or a quick treat when a sweet craving strikes. The versatility of these Chocolate M&M Cookies is another reason I love them so much – they’re fantastic on their own, but they also elevate any dessert spread.
For serving, I recommend enjoying them warm from the oven, perhaps with a glass of cold milk for the ultimate nostalgic experience. They also pair beautifully with a scoop of vanilla ice cream or can be used to create mini ice cream sandwiches. If you’re looking to switch things up, consider adding a handful of chopped nuts like walnuts or pecans for an extra layer of texture, or even swapping out some of the M&Ms for mini chocolate chips for an even more intense chocolate hit. Don’t be afraid to experiment! I truly encourage you to give these Chocolate M&M Cookies a try – you won’t be disappointed!
Frequently Asked Questions:
Can I make these cookies ahead of time?
Absolutely! You can bake the cookies and store them in an airtight container at room temperature for up to 3-4 days. They tend to be best when enjoyed within the first couple of days. For longer storage, you can freeze baked cookies or even the dough balls before baking.
How can I prevent my cookies from spreading too much?
To minimize spreading, ensure your butter is softened but not melted. Also, chilling the dough for at least 30 minutes before baking can make a significant difference. Chilled dough holds its shape better in the oven, resulting in thicker, chewier cookies.
Chocolate M&M Cookies
Deliciously chewy chocolate cookies loaded with M&Ms for a classic treat.
Ingredients
-
8 tablespoons unsalted butter, softened to room temperature
-
¼ cup white granulated sugar
-
½ cup cocoa powder (regular good quality, unsweetened)
-
½ cup brown sugar (or muscovado sugar)
-
1 teaspoon vanilla extract
-
2 large eggs
-
1 and ½ cups all-purpose flour
-
1 teaspoon baking soda
-
¼ teaspoon salt
-
¾ cup M&Ms (no peanuts)
Instructions
-
Step 1
Preheat oven to 350°F (175°C). Line baking sheets with parchment paper. -
Step 2
In a large bowl, cream together the softened butter, white granulated sugar, and brown sugar until light and fluffy. -
Step 3
Beat in the vanilla extract and then the eggs one at a time, mixing well after each addition. -
Step 4
In a separate medium bowl, whisk together the cocoa powder, all-purpose flour, baking soda, and salt. -
Step 5
Gradually add the dry ingredients to the wet ingredients, mixing until just combined. Do not overmix. -
Step 6
Stir in the M&Ms until evenly distributed throughout the dough. -
Step 7
Drop rounded tablespoons of dough onto the prepared baking sheets, about 2 inches apart. -
Step 8
Bake for 9-11 minutes, or until the edges are set and the centers are still slightly soft. -
Step 9
Let the cookies cool on the baking sheets for a few minutes before transferring them to a wire rack to cool completely.
Important Information
Nutrition Facts (Per Serving)
It is important to consider this information as approximate and not to use it as definitive health advice.
Allergy Information
Please check ingredients for potential allergens and consult a health professional if in doubt.