Easy St. Patrick’s Day Cookies-Festive & Delicious Treats
Easy St. Patrick’s Day Cookies are the perfect way to add a splash of festive fun to your celebrations without any fuss. As the emerald isle calls and the spirit of St. Paddy’s Day fills the air, who can resist a sweet treat? These delightful cookies are a crowd-pleaser for a reason: they’re incredibly simple to make, meaning even the most novice bakers can whip up a batch in no time. They embody the joy of the holiday with their vibrant green hues and cheerful decorations, making them ideal for parties, school events, or just a sweet afternoon pick-me-up. What truly makes these Easy St. Patrick’s Day Cookies so special is their adaptability; you can personalize them with your favorite sprinkles, edible glitter, or even a simple drizzle of white icing to mimic a pot of gold. Get ready to spread some luck and deliciousness with this foolproof recipe!
Easy St. Patrick’s Day Cookies
Get ready to embrace the luck of the Irish with these incredibly simple yet utterly delightful St. Patrick’s Day cookies! These vibrant green treats are perfect for a festive baking session with family, a potluck with friends, or just to add a little bit of cheer to your day. The beauty of this recipe lies in its minimal effort for maximum impact. We’re going to transform a humble box of cake mix into festive, flavorful cookies that are sure to be a hit. No complicated chilling or rolling required, just pure, unadulterated cookie joy.
These cookies have a wonderful soft and chewy texture, a pleasant sweetness, and a beautiful, eye-catching green hue that screams St. Patrick’s Day. The secret to their ease is the cake mix, which acts as a fantastic base, providing the perfect balance of flour, sugar, and leavening agents. This means you don’t need to worry about precise measurements of multiple dry ingredients. We’re essentially taking a shortcut to deliciousness, and who can argue with that? Plus, the gel food coloring allows for an intense, vibrant green that you just can’t achieve with liquid food coloring.
Let’s gather our simple ingredients and get ready to bake some magic!
Ingredients:
Cooking Instructions:
Now that we have all our ingredients ready, let’s dive into the fun part – making these festive cookies!
1. Prepare the Cookie Dough Base: In a large mixing bowl, combine the entire box of white cake mix (approximately 3 cups), the 2 large eggs, and the 1/3 cup of vegetable oil. This is where our cookie magic begin extracts. The cake mix provides the essential structure and flavor, the eggs act as a binder and add richness, and the vegetable oil ensures a wonderfully tender and moist cookie. Use a sturdy spoon or a hand mixer on low speed to start combining the ingredients. As the mixture starts to come together, it might look a bit crum extractbly at first, which is perfectly normal. Just keep mixing until you have a cohesive dough. Don’t overmix at this stage, as that can lead to tougher cookies. We want just enough mixing to incorporate everything smoothly.
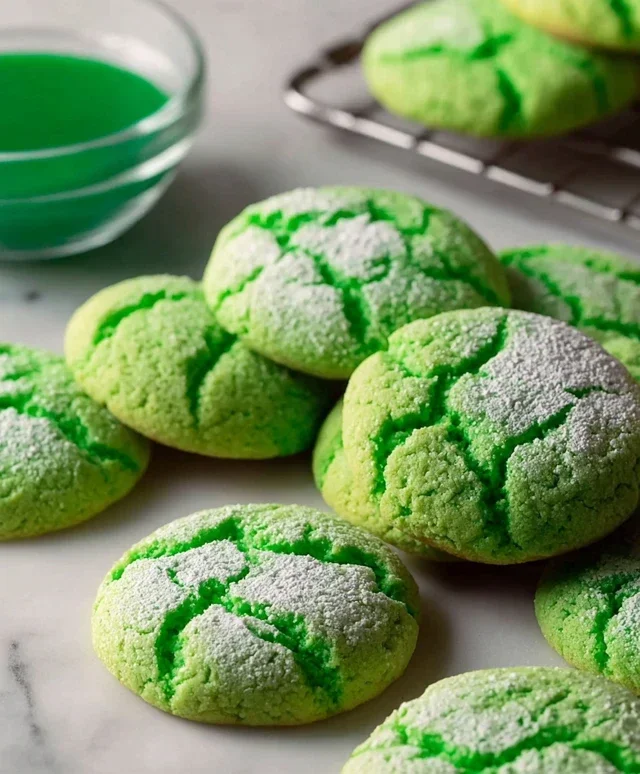
2. Achieve the Perfect St. Patrick’s Day Green: Now for the fun and festive part! Add the 1/4 teaspoon of Kelly green gel food coloring to your cookie dough. Gel food coloring is key here because it’s highly concentrated, meaning you need less of it to achieve a vibrant color, and it won’t add extra moisture to your dough, which could affect the cookie’s texture. Start by adding about half of the suggested amount and mix it in thoroughly. Then, add more a little at a time until you reach your desired shade of bright, celebratory green. Mix the food coloring in thoroughly until the dough is uniformly colored. This might take a minute or two of gentle folding or mixing to ensure there are no streaks of white remaining. The dough will transform into a beautiful, festive green, ready to impress!
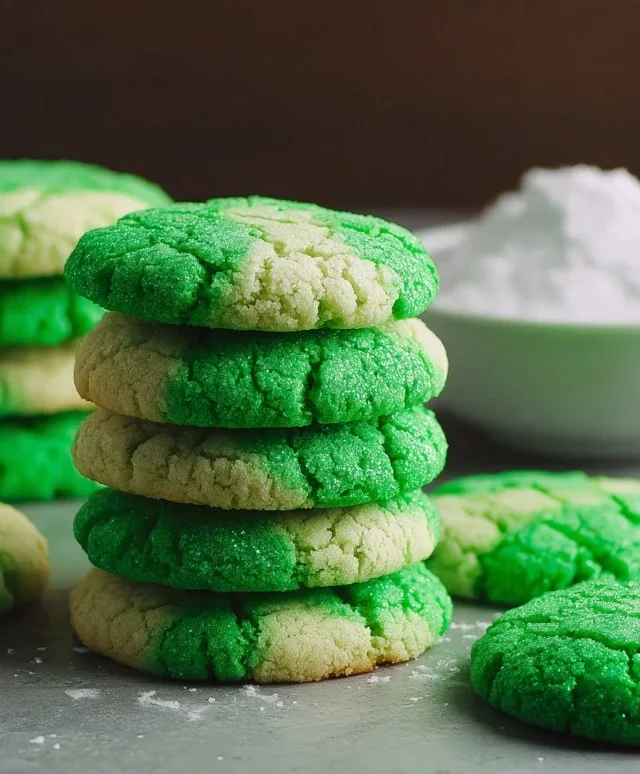
3. Forming the Cookies and Adding Sweetness: Once your dough is a beautiful green, it’s time to form the cookies. You’ll notice the dough will be slightly sticky, which is good! This is what will give us those lovely chewy cookies. Place the 3 tablespoons of granulated sugar in a small, shallow bowl. Roll each cookie dough ball into a small ball, about 1 inch in diameter. Then, gently roll each ball in the granulated sugar until it’s evenly coated. This sugar coating will give the cookies a slight crunch on the outside and a beautiful sparkle once baked. After rolling in granulated sugar, place these cookie balls about 2 inches apart on a baking sheet lined with parchment paper or a silicone baking mat. The parchment paper or mat will prevent sticking and make for easy cleanup. Don’t overcrowd the baking sheet, as the cookies will spread slightly as they bake.
4. Baking to Perfection: Preheat your oven to 350 degrees Fahrenheit (175 degrees Celsius). Place the prepared baking sheets into the preheated oven. Bake for approximately 9 to 12 minutes. The exact baking time will depend on your oven and the size of your cookie balls, so keep a close eye on them. You’re looking for the edges to be lightly golden brown and set, while the centers should still look slightly soft. They will continue to cook and firm up slightly as they cool on the baking sheet. Overbaking will result in dry, hard cookies, so err on the side of slightly underbaked if you’re unsure.
5. Cooling and Finishing Touches: Once the cookies are baked, carefully remove the baking sheets from the oven. Let the cookies cool on the baking sheets for about 5 minutes. This initial cooling period allows them to set up properly before you move them. After 5 minutes, carefully transfer the cookies to a wire cooling rack to cool completely. While the cookies are cooling, prepare your simple glaze. In a small bowl, whisk together the 6 tablespoons of powdered sugar with a tiny splash of water (start with just 1/2 teaspoon and add more, drop by drop, only if needed) until you have a smooth, drizzly glaze. The glaze should be thick enough to coat the back of a spoon but thin enough to drizzle easily. Once the cookies are completely cool, you can generously drizzle this glaze over the top of each cookie. For an extra festive touch, you can add a few green sprinkles before the glaze sets! Let the glaze set completely before stacking or storing your delightful St. Patrick’s Day cookies. Enjoy the sweet taste of your festive creations!
Conclusion:
And there you have it! These Easy St. Patrick’s Day Cookies are the perfect way to add a touch of festive fun to your celebrations without any fuss. Their simplicity makes them incredibly approachable, even for begin extractner bakers, and the delightful green hue is sure to bring smiles all around. The slightly sweet, buttery flavor is wonderfully satisfying, and they’re so versatile! You can enjoy them just as they are, or get creative with your decorations. They’re fantastic on their own with a cup of coffee or tea, but also make a charming addition to a dessert platter alongside other St. Patrick’s Day treats. For variations, consider adding a hint of mint extract to the dough for an extra burst of flavor, or perhaps some festive sprinkles mixed into the batter. I truly encourage you to give this recipe a try – I’m confident you’ll love how quick and rewarding it is to bake these cheerful cookies!
Frequently Asked Questions:
Can I make these cookies ahead of time?
Absolutely! These Easy St. Patrick’s Day Cookies can be baked a day or two in advance and stored in an airtight container at room temperature. This makes them perfect for prepping ahead of your St. Patrick’s Day festivities.
What kind of green food coloring should I use?
For the best color, I recommend using gel food coloring. It provides a more vibrant and concentrated green hue compared to liquid food coloring, and you’ll need less of it, which won’t affect the dough’s consistency as much.
Are there any gluten-free options for this recipe?
Yes! While this recipe isn’t specifically written for gluten-free, you can often substitute a good quality gluten-free all-purpose flour blend one-to-one. You might need to adjust the liquid slightly, but it’s usually a straightforward swap.
Easy St. Patrick’s Day Cookies
Simple and festive green cookies perfect for St. Patrick’s Day celebrations. Uses a cake mix for a quick and easy recipe.
Ingredients
-
1 box (15.25 oz) white cake mix (about 3 cups)
-
2 large eggs
-
1/3 cup vegetable oil
-
1/4 teaspoon Kelly green gel food coloring
-
3 tablespoons granulated sugar
-
6 tablespoons powdered sugar
Instructions
-
Step 1
Preheat oven to 350°F (175°C). Line baking sheets with parchment paper. -
Step 2
In a large bowl, combine the white cake mix, eggs, and vegetable oil. Mix until just combined. -
Step 3
Add the Kelly green gel food coloring to the dough and mix until evenly distributed. -
Step 4
Roll dough into 1-inch balls and place them on the prepared baking sheets, about 2 inches apart. -
Step 5
Gently press the balls with the bottom of a glass or a cookie press. This helps them spread slightly. -
Step 6
Bake for 8-10 minutes, or until the edges are lightly golden and the centers are set. -
Step 7
Let the cookies cool on the baking sheets for a few minutes before transferring them to a wire rack to cool completely. -
Step 8
Once cooled, lightly dust the cookies with powdered sugar for a festive finish.
Important Information
Nutrition Facts (Per Serving)
It is important to consider this information as approximate and not to use it as definitive health advice.
Allergy Information
Please check ingredients for potential allergens and consult a health professional if in doubt.