Piped Rainbow Shortbread Cookies- Easy & Delicious Treat
Piped rainbow shortbread cookies are more than just a sweet treat; they’re a little piece of edible sunshine, ready to brighten any day. Who can resist the delicate crunch and buttery goodness of perfectly baked shortbread? It’s a timeless classic for a reason, offering that comforting, melt-in-your-mouth texture that so many of us adore. But what elevates these classic delights into something truly magical? It’s the vibrant, swirling artistry of the piped rainbow design. Imagin extracte biting into a cookie that’s as visually stunning as it is delicious, with every swirl of color bringin extractg a playful, joyful element to your palate. These piped rainbow shortbread cookies are perfect for celebrations, a fun baking project with loved ones, or simply as a delightful way to add a splash of color and cheer to your afternoon tea. Get ready to create some edible masterpieces!
Piped Rainbow Shortbread Cookies
Get ready to unleash your inner artist and create a batch of stunning Piped Rainbow Shortbread Cookies! These aren’t your average, everyday cookies. They’re buttery, tender shortbread, elevated with vibrant swirls of color, and finished with a delightful crunchy coating. Perfect for parties, holidays, or just brightening up a Tuesday, these cookies are as fun to make as they are to eat. The secret to their magic lies in a simple piping technique that transforms basic dough into a work of edible art. Don’t be intimidated by the piping; it’s surprisingly straightforward and incredibly rewarding. Let’s dive in!
Ingredients:
Preparing the Shortbread Dough
The foundation of these beautiful cookies is a classic, buttery shortbread dough. It’s wonderfully simple to make, and the key is to ensure your butter is at the right temperature – softened, but not melted. This allows it to cream properly with the sugar, creating a light and tender crum extractb.
1. In a large mixing bowl, whisk together the all-purpose flour, sugar, and salt. This ensures that the dry ingredients are evenly distributed, preventing pockets of salt or sugar in your cookies.
2. Add the softened butter pieces to the dry ingredients. Using an electric mixer with a paddle attachment (or a sturdy spatula and some elbow grease), cream the butter and dry ingredients together. Mix on low speed until the mixture resembles coarse crum extractbs. You want to avoid overmixing at this stage; we’re just breaking down the butter and combining it with the flour mixture. If you don’t have an electric mixer, you can do this by hand by rubbing the butter into the flour mixture with your fingertips until it resembles breadcrum extractbs.
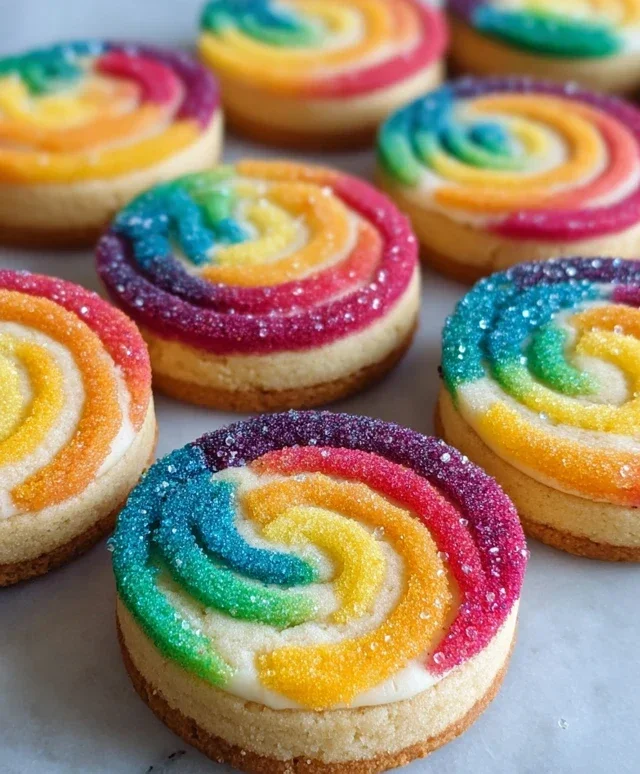
Coloring and Piping the Rainbows
This is where the fun really begin extracts! Dividing the dough and coloring it allows us to create those beautiful rainbow effects. Gel food coloring is recommended as it’s highly concentrated and won’t add excess moisture to the dough, which could affect the texture.
1. Divide the dough evenly into four separate bowls. The easiest way to do this is to weigh the total dough and then divide the weight by four. This ensures you have equal amounts of each color for balanced rainbows.
2. Add a few drops of gel food coloring to each bowl of dough. Start with a small amount of coloring and gradually add more until you achieve your desired vibrant hues. Knead each portion of dough gently until the color is uniform. Be careful not to overwork the dough at this stage, as excessive kneading can develop the gluten in the flour, leading to tougher cookies. Once colored, flatten each ball of dough into a disc, wrap it tightly in plastic wrap, and refrigerate for at least 30 minutes. This chilling period is crucial for making the dough easier to handle and pipe. It firms up the butter, making the dough less sticky.
Shaping and Baking
Once chilled, the dough is ready to be transformed into our rainbow creations. A piping bag with a medium-sized round tip is ideal for this. If you don’t have a piping bag, you can snip a corner off a sturdy zip-top bag and use that.
1. Preheat your oven to 350°F (175°C). Line baking sheets with parchment paper. This prevents sticking and makes for easy cleanup.
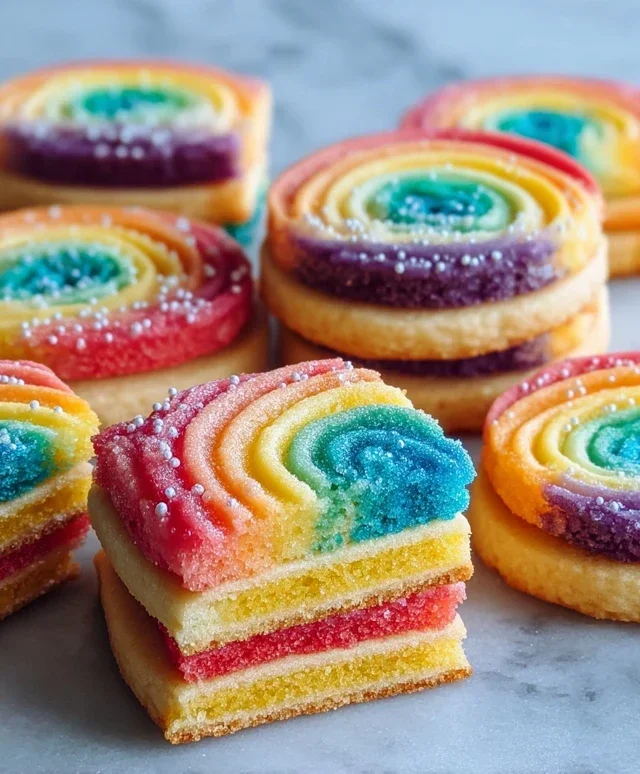
2. Take one chilled disc of dough at a time from the refrigerator. You’ll want to work relatively quickly to prevent the dough from warming up too much. Roll out each colored disc between two sheets of parchment paper or on a lightly floured surface to about ¼-inch thickness.
3. Using a knife or a pizza cutter, cut each rolled-out colored dough sheet into long, thin strips, about ¼-inch wide. The goal here is to create even strips so that when you layer them, the rainbow effect is consistent.
4. Now, it’s time to assemble your rainbow. Take one strip of each color and lay them side-by-side, gently pressing them together to form a single, multi-colored strip. You can then gently roll this multi-colored strip slightly to help the colors adhere to each other. Carefully transfer this layered strip to your prepared piping bag fitted with a round tip. If your dough becomes too soft to handle, pop it back in the refrigerator for a few minutes.
5. Pipe the dough onto your prepared baking sheets. Hold the piping bag vertically, about ½ inch above the baking sheet, and apply even pressure to pipe your cookie shapes. You can pipe simple rounds, elongated oval shapes, or even swirls. Aim for cookies that are roughly the same size so they bake evenly. Leave about 1-inch of space between each cookie as they will spread slightly.
6. Bake for 12-15 minutes, or until the edges are lightly golden. The center should still look pnon-alcoholic ale. Overbaking will result in hard, dry cookies. Keep a close eye on them during the last few minutes of baking.
7. Let the cookies cool on the baking sheets for about 5 minutes before transferring them to a wire rack to cool completely. This allows them to set properly and prevents them from breaking.
Decorating with a Sweet Finish
The final step is to add that irresistible touch of sweetness and sparkle. The white melting wafers provide a beautiful contrast to the colorful shortbread.
1. Once your shortbread cookies are completely cool, prepare your white melting wafers. Place the white melting wafers in a microwave-safe bowl and melt them according to package directions, usually in 30-second intervals, stirring between each interval, until smooth and fully melted. Be careful not to overheat them, as they can seize up.
2. Dip one end of each cooled shortbread cookie into the melted white chocolate. You can dip about one-third or one-half of the cookie, depending on your preference. Allow any excess chocolate to drip back into the bowl.
3. Immediately sprinkle the wet chocolate with rainbow nonpareils. The nonpareils will stick to the melted chocolate, adding a beautiful shimmer and crunch.
4. Place the decorated cookies back onto the parchment-lined baking sheet or a wire rack with parchment underneath to catch drips. Allow the chocolate to set completely before serving or storing. You can speed this up by placing them in the refrigerator for about 10-15 minutes.
Enjoy these delightful Piped Rainbow Shortbread Cookies! They’re a vibrant and delicious treat that is sure to bring a smile to everyone’s face.
Conclusion:
I hope you’ve enjoyed learning how to create these delightful Piped Rainbow Shortbread Cookies! These aren’t just any cookies; they are a vibrant explosion of color and buttery, melt-in-your-mouth goodness. The beauty of this recipe lies in its simplicity combined with its stunning visual appeal. They are perfect for celebrations, holidays, or simply when you want to add a splash of joy to your day. The crisp, crum extractbly texture of the shortbread is the ideal canvas for the playful rainbow piping, making each cookie a miniature work of art.
These cookies are wonderfully versatile. Serve them at birthday parties for a guaranteed hit, on a rainbow-themed dessert table, or alongside a cup of tea for a special afternoon treat. For variations, feel free to experiment with different piping tip shapes to create unique patterns, or add a touch of edible glitter for extra sparkle. You could even infuse the dough with a hint of citrus zest or almond extract for a subtle flavor twist. Don’t be intimidated by the piping; practice makes perfect, and even slightly imperfect rainbows are incredibly charming!
I highly encourage you to give these Piped Rainbow Shortbread Cookies a try. They are a rewarding baking project that brings smiles to faces, both while making them and while devouring them. Happy baking!
Frequently Asked Questions:
What kind of food coloring should I use for the piping?
For the most vibrant and consistent colors, I recommend using gel food coloring. A little goes a long way, and it won’t add excess liquid to your frosting, which could make it too runny. You can find gel food coloring in most baking aisles or specialty craft stores.
Can I make the shortbread dough ahead of time?
Absolutely! The shortbread dough can be made up to 2-3 days in advance and stored, tightly wrapped, in the refrigerator. This can actually make it easier to handle and pipe. Just allow it to soften slightly at room temperature before piping.
Piped Rainbow Shortbread Cookies
Delightful shortbread cookies adorned with vibrant piped rainbow frosting and a festive sprinkle topping. A perfect treat for celebrations or just because!
Ingredients
-
2¼ cups all-purpose flour
-
¾ cup sugar
-
¼ tsp salt
-
1 cup unsalted butter, cut into pieces
-
Gel food coloring (4 colors of your choice)
-
1 cup white melting wafers
-
Rainbow nonpareils (for topping)
Instructions
-
Step 1
In a large bowl, whisk together the all-purpose flour, sugar, and salt. Cut in the cold unsalted butter pieces using a pastry blender or your fingertips until the mixture resembles coarse crumbs. -
Step 2
Divide the dough into 4 equal portions. Add a different gel food coloring to each portion and knead gently until the color is evenly distributed. -
Step 3
On a lightly floured surface, roll each colored dough portion into a rope about ½ inch in diameter. Lay the ropes side-by-side. Gently twist the ropes together to create a marbled effect. Alternatively, roll out each color and layer them, then roll up tightly like a jelly roll. Wrap each log tightly in plastic wrap and chill for at least 30 minutes. -
Step 4
Preheat oven to 350°F (175°C). Line baking sheets with parchment paper. Slice the chilled dough logs into ¼-inch thick cookies and place them on the prepared baking sheets, about 1 inch apart. -
Step 5
Bake for 12-15 minutes, or until the edges are lightly golden. Let the cookies cool on the baking sheets for a few minutes before transferring them to a wire rack to cool completely. -
Step 6
Melt the white melting wafers according to package directions. Transfer to a piping bag with a small round tip. Decorate the cooled shortbread cookies with piped designs. -
Step 7
Immediately sprinkle the piped designs with rainbow nonpareils before the melting wafers set.
Important Information
Nutrition Facts (Per Serving)
It is important to consider this information as approximate and not to use it as definitive health advice.
Allergy Information
Please check ingredients for potential allergens and consult a health professional if in doubt.